Table of Contents
- Summary
- Antivirus Conflicts
- Set Client Computer to Use Remote Data
- Can the Devices Communicate with Each Other?
- Check Permissions and Settings on Master Computer
Summary
This article will take you through the steps to troubleshoot an SQL error on a network database.
**Make sure you are logged in as an administrator on all the computers running MyoVision before continuing.**
In a network database, one computer stores the data for the network database (the Master computer), while the other computers send data to and receive data from the Master computer (Client computers).
Antivirus Conflicts
In the past, some antiviruses have caused customers to experience SQL errors. If you are running Norton, McAfee, Kaspersky, or Webroot, try uninstalling your antivirus and restarting the computer.
Antivirus software usually has an additional firewall or layer of protection that can keep your Network Database from communicating properly.
Once you have uninstalled your antivirus and restarted the computer, try re-opening the MyoVision software and starting a new exam to see if the error has been resolved.
If you are using a third-party firewall, you will need to speak with your IT personnel to see if the firewall is preventing the network database from communicating properly.
Set Client to Use Remote Data
Before troubleshooting any connection issues. make sure the Client computer is setup to use remote data inside the MyoVision software.
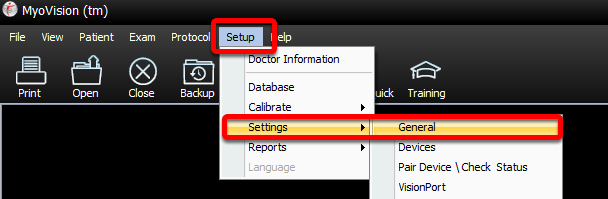
- Open the Setup menu on the top menu bar, go down to Settings, and select General.
- Click the Advanced button.
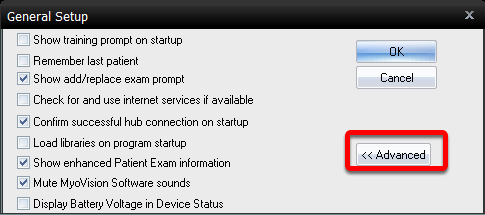
- Make sure the checkbox labeled, "Use SQL remote data" is checked. Then, click OK.


Can the Devices Communicate With Each Other?
The first step is to verify the computers running the network database are able to communicate with each other. In order for the two computers to communicate they MUST be on the same internet network.
To test the communication, MyoVision recommends using a "ping" test. In order to run a ping test you will need the IP address of the Master computer and one of the Client computers.
A ping test is where one computer sends a ping to the designated address. If the ping is successful and the computers can communicate, the "pinged" computer will send back a reply.
Find IP Addresses
In order to run a ping test, you will first need to find the IP addresses of the Master computer and one of the Client computers.
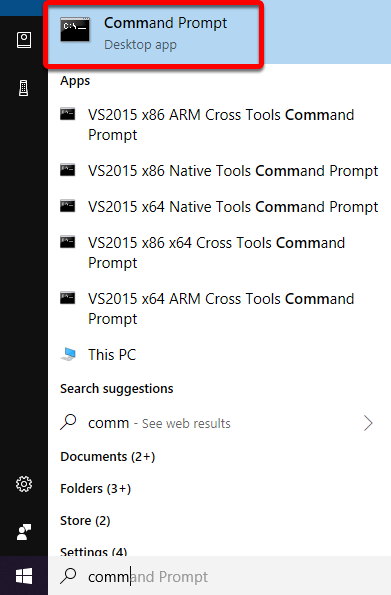
- On both the Master computer and the Client computer, open the command prompt application.
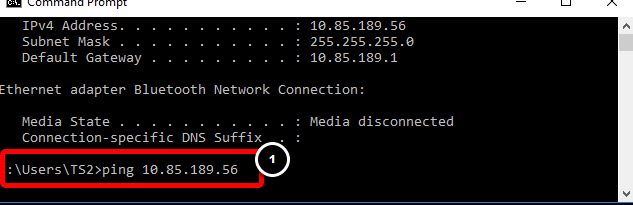
- When the command prompt opens, type "ipconfig" and press enter. The command prompt will tell you the IPv4 address.
Make note of the two IPv4 addresses to be used in the ping test for the next step.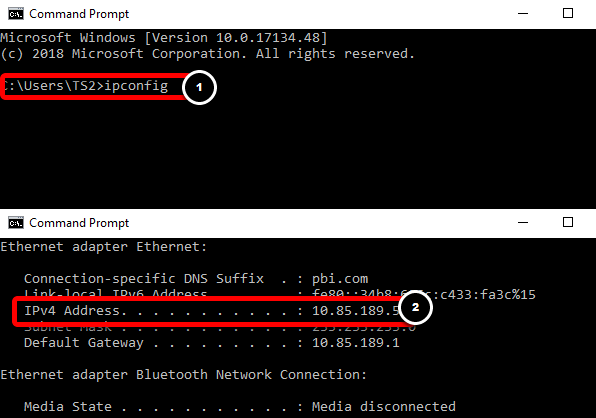


Run a Ping Test
Now that you have both IP addresses, the next step is to the ping test is to verify the computers are able to communicate with each other.
- Open command prompt on the Client computer. Type in "ping" followed by the IP address of the Master computer.
- If the ping test is successful, command prompt will show the "reply" from the Master computer.
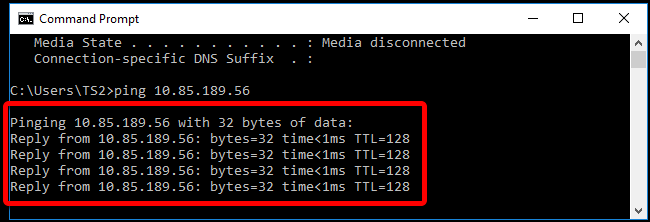 A successful ping is when the two computers can see each other on the network and communicate with each other.

 A successful ping is when the two computers can see each other on the network and communicate with each other.
Check Permissions and Settings on Master Computer
After you have verified that the computers on the network can see each other, the next step is to make sure that the permissions on the SQL server and the firewall on the Master computer are setup to allow the Client computers access to the network database.
Firewall Permissions
In order for the Client computers to access the network database on the Master, the Master computer's firewall will needs to have a rule that allows the Client computers access.
- Open up Windows Firewall Settings.
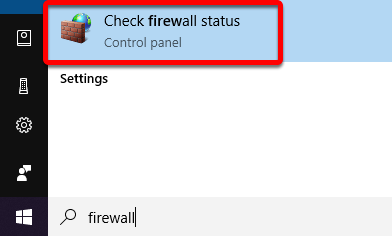
- When the Firewall Settings window opens, select the Advanced Settings options.
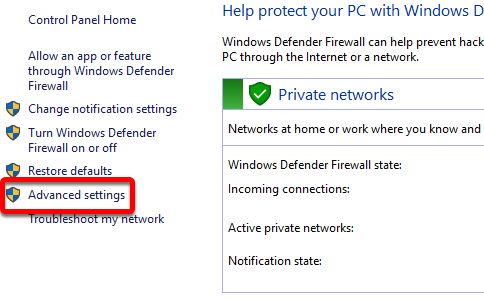
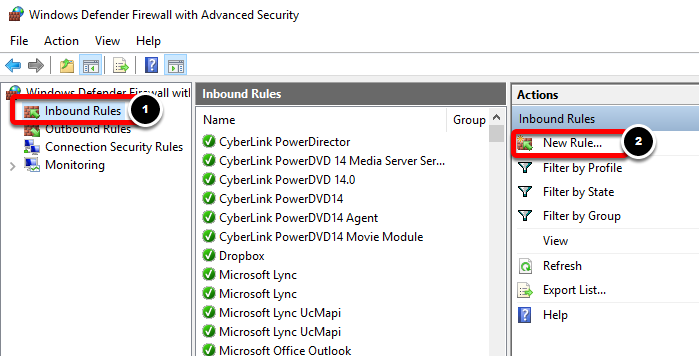
- Select Inbound Rules from the menu on the left. Then select New Rule from the toolbar on the right.
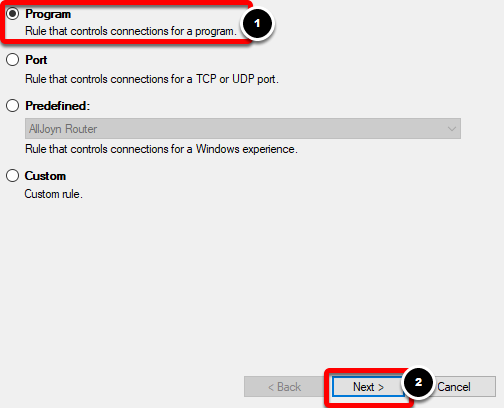
- On the first page of the new rule, select the Program option. Then click Next to continue.
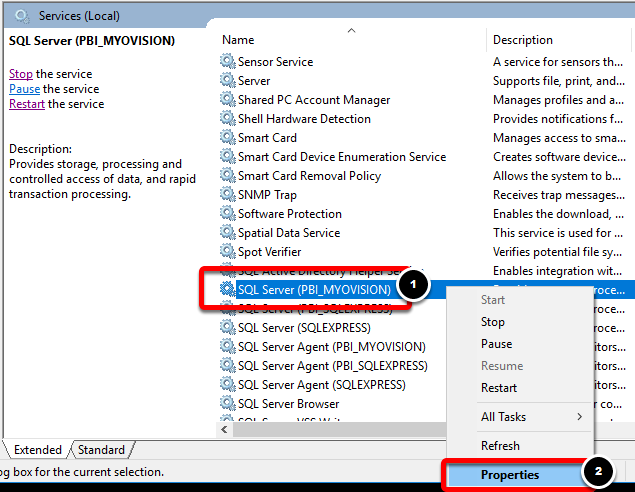
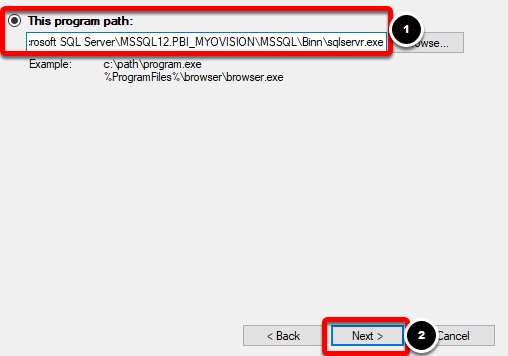
- One the next screen, you will be prompted to enter the program path. To locate the program path, open up Windows Services, locate the SQL Server service, right-click the service, and select Properties.
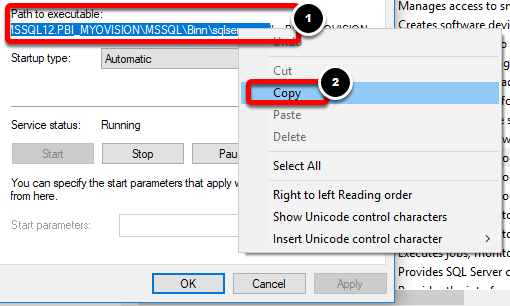
- Highlight the Path to executable between the quotation marks. Right-click and select Copy.
- Paste the Path to executable, that you just copied into the Program Path of the Windows Firewall. Then, click Next to continue.
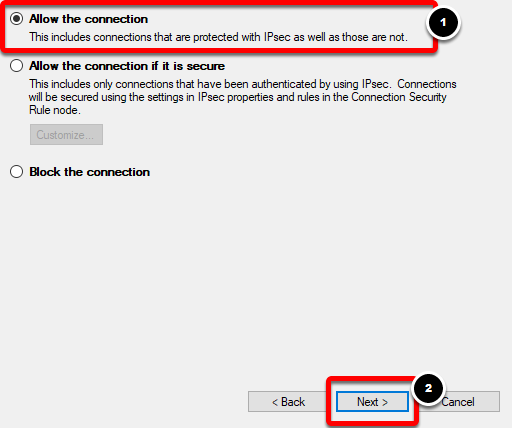
- On the next screen, select to Allow the connection. Then click the Next button.
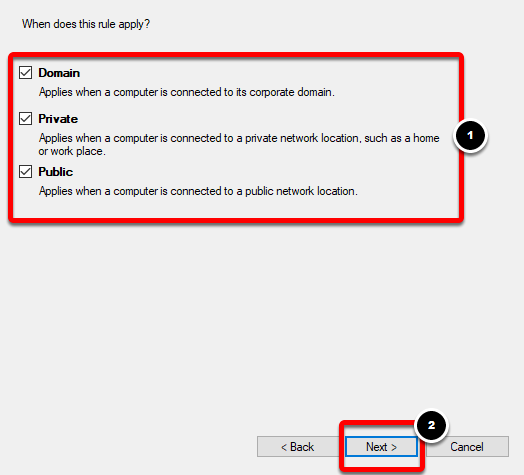
- The firewall will ask when the rule applies. Make sure that Domain, Private, and Public all have their boxes checked.
- Name the rule MyoVision or MyoVision SQL Server and click Finish.
**The exact name of the rule doesn't matter, but it should be something that you will easily be able to recognize and remember.**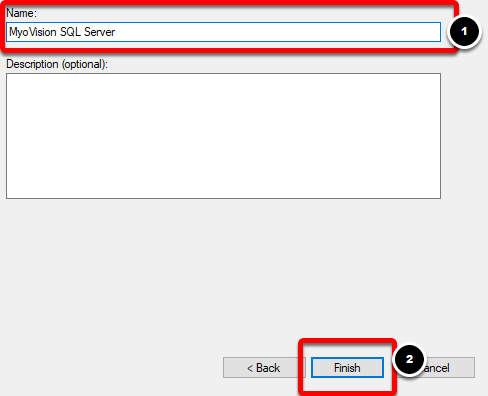
Now you will need to create a second New Rule. Follow steps 1-10 again, but instead of using the SQL Server as the path to executable, select the SQL Server Browser.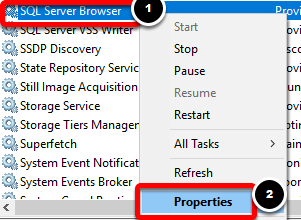


Once the firewall rules have been setup on the Master computer, the client computers will be able to go through the Master's computer firewall in order to access the data on the network database.
Enable Network Protocols
In order for the Client computers to access the data stored on the SQL Server of the Master computer the SQL Server of the Master computer needs to configured to enable TCP/IP connections.
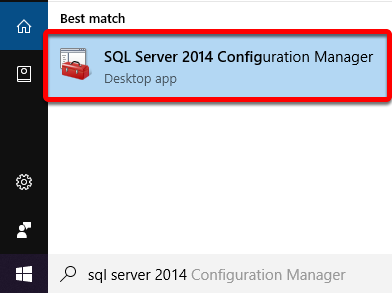
- To enable TCP/IP settings you will need to open the SQL Server Configuration Manager 2014. Depending on what version of SQL Server you are running the program's name may be slightly different.
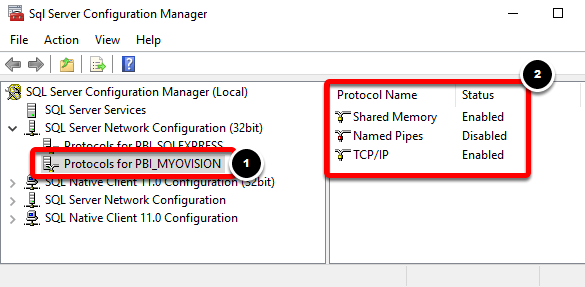
- When SQL Configuration Manager opens you will want to make sure that the protocols for your SQL Server have Shared Memory and TCP/IP enabled. (See picture below.)


Test the Network Connection on the Client Computer
After the firewall permissions and server configurations have been set, the next step is to perform a test connection on the Client computer.
**Before you begin, you will need to get the name of the Master computer. Typically the name can be found by searching for, "name," in the Windows Search Bar. You will want to find the Device name NOT the name of the user account. You will also need to have SQL Server Management Studio installed on the Client computer. (Click Here to download SQL Server Management Studio from the Microsoft website.)**
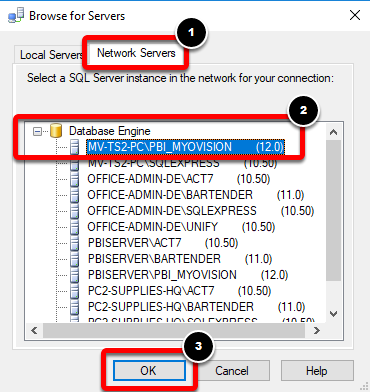
- Open SQL Server 2014 Management Studio. When the Connect to Server window opens, click the Server name drop-down and select the option.
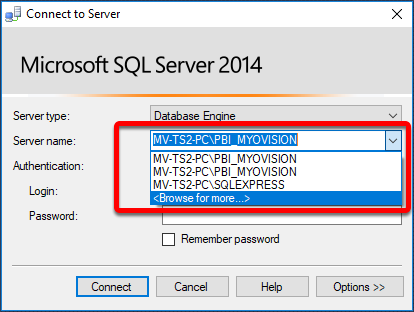
- Click the Network Servers tab in the Browse for Servers top menu. Find the SQL Server Instance that matches the Device Name of the Master computer, followed by SQLEXPRESS or PBI_MYOVISION. Click the OK button to begin connecting to SQL Server Instance.
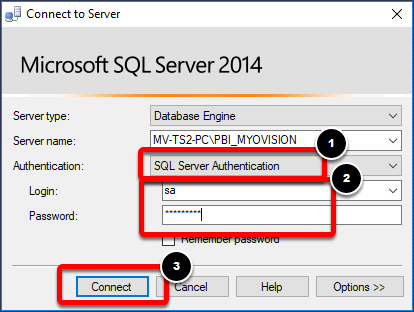
- Click the drop-down menu labeled Authentication, select SQL Server Authentication. Set the login to "sa" and enter the password for your SQL Server Instance. Click the Connect button to test the connection.
- If your instance ends in "PBI_MYOVISION" the default password is "MyoVision01".
- If your instance ends in "SQLEXPRESS" the default password is "Sql2008r2".
 If SQL Server Management Studio was able to successfully connect to the server the next step is to test the connection inside of MyoVision. Otherwise, if SQL Server Management studio was unable to connect, you will want to re-check your firewall permissions and server configurations.
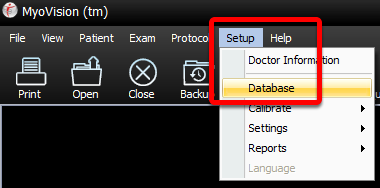
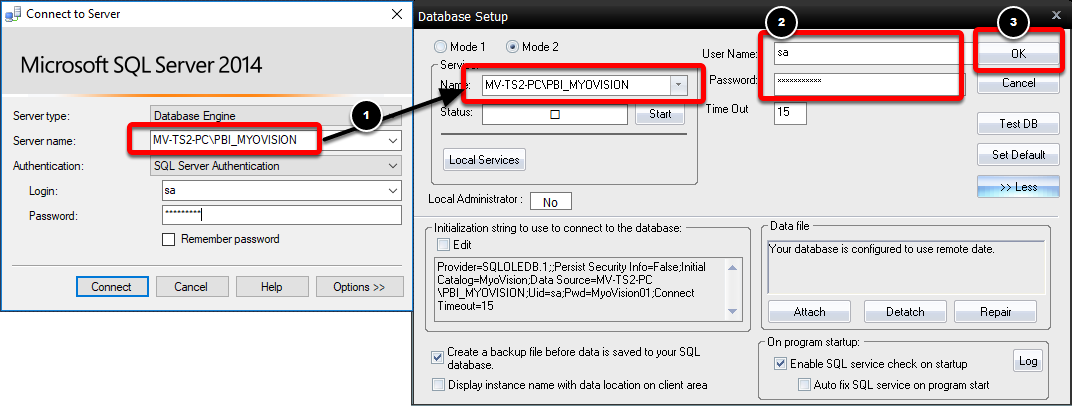
- Open the MyoVision software, open the Setup menu in the top menu bar, and select Database.
- Make sure the Database Setup is set to Mode 2. Then click on the Advanced button. In the Data File message box check to make sure your Client computer is set to use remote data. (Click Here if your database is not setup to use remote data.)
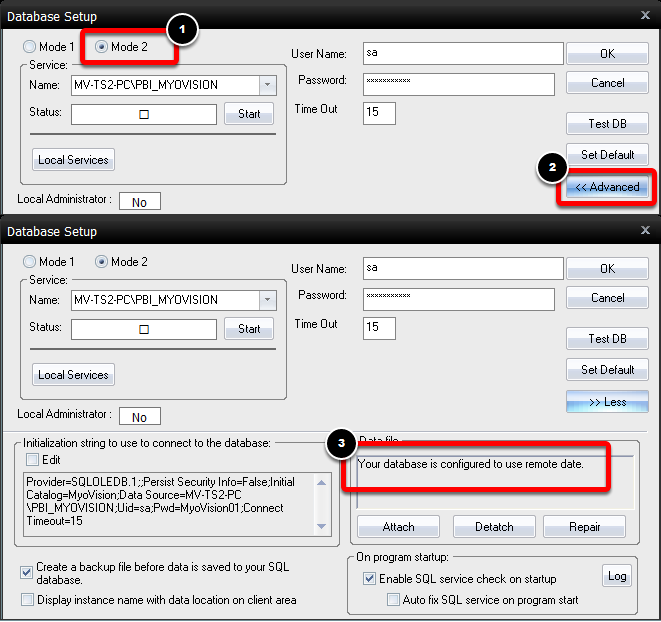
- Verify that the Service Name matches the Server name that was connected to in Microsoft SQL Server Management Studio. Set the User Name to "sa" and enter the password that you used to login to SQL Server Management Studio. Click OK to save your changes.
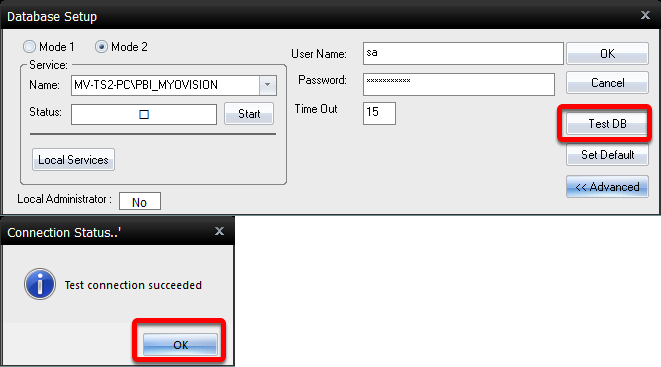
- Open the Setup menu again and select Database.

- Click the TestDB button to perform a test connection. If the Client computer is able to access the network database on the Master computer, you will get a pop-up window saying, "Test connection succeeded."


 If SQL Server Management Studio was able to successfully connect to the server the next step is to test the connection inside of MyoVision. Otherwise, if SQL Server Management studio was unable to connect, you will want to re-check your firewall permissions and server configurations.


