Summary
This article will walk you through setting up your SERIES-5 (white label) MyoVision system for the first time.
The contents of your MyoVision system will vary depending on the system you ordered. Refer to the packing list that came with your system.
Before you Begin
- Install the MyoVision Software on your computer
- Need help with installation? View the support article: How Do I Install the MyoVision Software?
- Unpack your devices
How to set up your MyoVision system - Hardware
1. VisionHUB Overview
VisionHUB
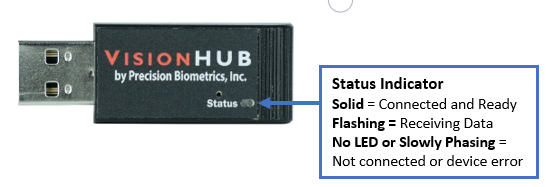
- The VisionHUB is the main hub that will connect all your devices and your computer.
- The VisionHUB must be plugged into the computer while using the SERIES-5 devices.
- The VisionHUB works best when there is a direct line of sight between it and the handheld devices.
- If line of sight is not possible, you can use a USB extender. We recommend this one.
2. Connect your VisionHUB
- Plug the VisionHUB into an available USB port on your computer.
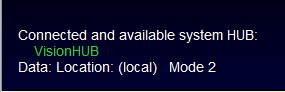
- When you have successfully connected, the Status Indicator light on the VisionHUB will turn solid blue and you will see the word 'VisionHUB" in green in the lower left corner of the screen under "Connected and available system HUB:"
- "Data: Location" is based on database settings and may be different than the image below.
- If you do not have a blue Status Indicator light or the software is not showing as connected, read this support article: Why won't my VisionHUB connect to my computer?
- "Data: Location" is based on database settings and may be different than the image below.
- When you have successfully connected, the Status Indicator light on the VisionHUB will turn solid blue and you will see the word 'VisionHUB" in green in the lower left corner of the screen under "Connected and available system HUB:"
- Configure the software for the VisionHUB
- In the MyoVision Software, go to Setup > Devices > Preferences (or press Control + 1 on the keyboard.)
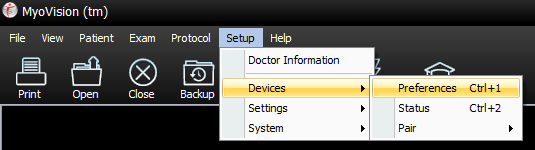
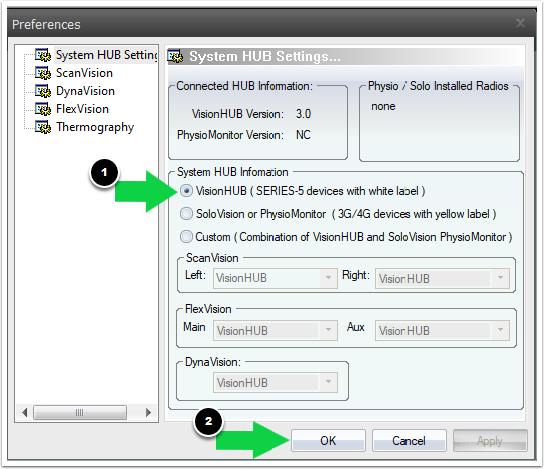
- Select the "VisionHUB" option then click "OK"
- If you have both SERIES-5 and 3G/4G devices see our support article HERE for instructions for a custom configuration then proceed to Step 3 "Device Overview" and Step 4 "Pair Devices to the computer" in this article
- In the MyoVision Software, go to Setup > Devices > Preferences (or press Control + 1 on the keyboard.)


3. Device Overview
ScanVision

- ScanVision Device Tips:
- Leave the Power Switch in the ON position at all times, unless you are traveling,
- This device has a power save feature that will automatically put the devices to sleep after a short period of time.
- Press the Start Button to wake the ScanVision from sleep.
- Visit our support article for Best Practices for Device Charging
- To help prevent corrosion and abnormal readings, clean your ScanVision on a daily to weekly basis. The more you use your device, the more often it will need cleaning. See our support article for how to Clean Your ScanVision Devices
- Change the Electrodes on a monthly basis. Tip: when you finish a jar of QuickScan Pads, it's a good time to buy new electrodes.
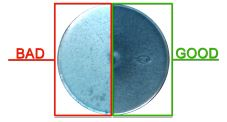
- Check your electrodes daily for any signs of cracks, worn metal, or corrosion.
- If you notice your electrodes are no longer dark matte grey, but a lighter silver and a bit shiny, they need to be replaced. (See image below.)
- Purchase supplies at Store.MyoVision.com
- Leave the Power Switch in the ON position at all times, unless you are traveling,

FlexVision

FlexVision Device Tips:
- Leave the Power Switch in the ON position at all times, unless you are traveling,
- This device has a power save feature that will automatically put the device to sleep after a short period of time.
- Press any red button to wake the FlexVision from sleep.
- Check our support article for Best Practices for Device Charging
- When performing a test, the device must be perpendicular to the ground. (Use the flat edge on the white part of label under the MyoVision logo for reference.) The front and back labels should never be towards the ceiling or the floor during use otherwise you will get inaccurate readings.
DynaVision

DynaVision Device Tips:
- Leave the Power switch in the On position unless you are travelling.
- This device has a power save feature that will automatically put the device to sleep after a short period of time
- Press the top start button to wake the DynaVision from sleep
- To change the batteries: remove the battery cover on the bottom of the device
- Make sure the red ribbon is underneath the batteries before snapping them in.
- Use Lithium AA batteries for best results
- Do not wrap the Lead Wires around the DynaVision. This can cause the barrel of the lead wire to break and can cause interference or inaccurate readings.
- To store, just be sure the barrel of the wire is not bent and there is no tension on the wires.
4. Pair Devices to the computer
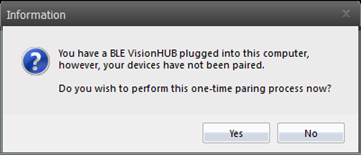
- When you first launch the MyoVision software with the VisionHUB plugged in, a pop-up window will prompt you to begin the pairing process. Click Yes, to go to the pairing window.
- If do not see the option, close then reopen the software with the VisionHUB plugged in.
- If you need to get to this setting again, click Setup > Devices > Pair > Series-5 (or press "control + 5" at the same time on your keyboard).
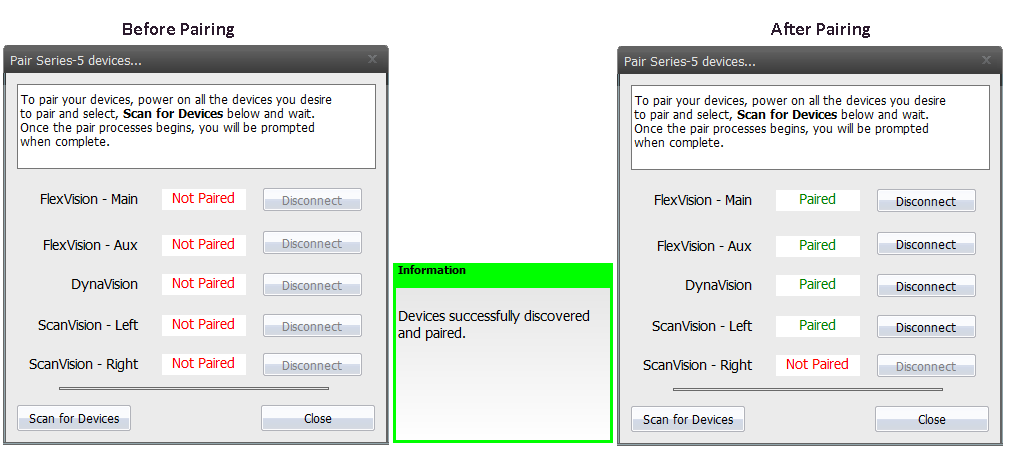
- Turn on all devices: Turn the Power Switch into the ON position and press the Start Button on each device
- Press "Scan for Devices" in the "Pair Series-5 devices...." window.
- This process can take a few minutes depending on your computer. Your devices will turn off one at a time as they pair.
- When the pairing process is complete, a pop-up in the lower right corner will appear and each device will say "Paired" next to it.
- The "Paired" devices will match what devices you own.
- If not all of the expected devices paired, turn on all the devices again by clicking the start button and click "Scan for Devices." Below is an example of a DynaROM system with a Single ScanVision.

5. Device Training and Use
- Now that you have successfully set up the MyoVision system, you can begin the online training. Click the links below to start:
- ScanVision Training - You will need to register or log-in first to enroll in the course.
- The ScanVision training will show you how to perform a static sEMG exam, including proper test technique, and explaining the results to your patients.
- FlexVision Training
- The FlexVision training will show you how to use the FlexVision devices and perform Range of Motion exams.
- DynaROM Training - You will need to register or log-in to enroll in the course. Click the DynaROM Certification under the "Training" to log-in or register.
- The DynaROM training will show you how to perform Dynamic sEMG exams with Range of Motion and how to interpret the results.
- ScanVision Training - You will need to register or log-in first to enroll in the course.
Upon completing your certification you'll also receive:
- A personalized certificate
- Join our network of Certified Doctors featured on our Doctor Locator
After you complete the online training and would like additional training, you can Schedule Your Remote Training Session
Search our Support Site for more information on your MyoVision and to troubleshoot common issues.
6. Software Setup
- See the articles below to complete the setup your MyoVision software
- Required
- Optional