This article will guide you through understanding the different pieces of your MyoVision system, setting up the MyoVision hardware, and will help you familiarize yourself with the different parts of each MyoVision device.
Go to training.myovision.com for the online training course.
Packing List and Supplies
When you receive your MyoVision system, read through the packing list and make sure that all the items listed have been included with your system.
Click through the tabbed menu below to see what items should be included with each device.
ScanVision and Supplies

- Charging brick for rechargeable MyoVision devices.
- One jar of QuickScan Pads.
- ScanVision rechargeable device.
- Charging Cable for rechargeable MyoVision devices.
- Ten electrodes, each ScanVision device will have five electrodes already installed plus five additional electrodes per device.
FlexVision and Supplies

If you purchased your FlexVision (2) with a SoloVision then you will receive the USB charging cable (1) to charge your device with.The USB end will connect to the MyoVision Wall Charger.
If you purchased your FlexVision with a PhysioMonitor then you will receive the Y-Charging Cable (3). This cable will plug directly into your PhysioMonitor on one end, and has a split end on the other side allowing you to charge both FlexVision devices at once,
FlexVision devices don't need to be calibrated and should come fully charged and ready to use.
DynaVision and Supplies

The DynaVision (1) is a battery powered unit. Included with your system there will be three AA lithium ion batteries (2). You must use lithium ion batteries with all battery powered MyoVision devices.
The DynaROM belt (3) is an adjustable belt you can clip the DynaVIsion onto during exams. For more information on the DynaROM belt, including assembly instructions, Click Here. You will be prompted to login or register after clicking on the previous link. If you haven't setup a MyoVision account yet, you could be missing out on great deals and informative training.
The lead wires (4) will plug directly into the DynaVision device. The red lead wires should go on the right and the white lead wires should go on the left. You will also need to attach the black lead wire into the channel marked Ground on the DynaVision. With the lead wires you will also receive a pack of Dynamic Electrodes (5), These electrodes will be placed directly on the skin and attach to the metal side of the lead wires. In order for the device to function it must have a metal to metal contact. Each pack of Dynamic Electrodes is for a single use only. Re-using electrodes between patients is unsanitary and can cause bad readings.
DynaVision and Supplies
When you receive your PhysioMonitor system the following supplies will be included
(1) PhysioMonitor Unit
(2) Power Brick and DC In connector
(3) Power cable (connects to the Power Brick and the wall to provide power to the PhysioMonitor)
(4) USB Cable (connects the PhysioMonitor to the computer)

SoloVision and Supplies
Included with your SoloVision (1) will be a USB cable (2). The SoloVision does NOT require any power cable, since it draws power directly from the computer.
After you have verified that everything listed in the Packing List was included with your order, you are ready to begin connecting your MyoVision System to your computer.
Setting Up Your Devices
The handheld devices transmit data to your SoloVision or PhysioMonitor. In order for the devices to communicate, they will need to be bound. If you purchased your devices directly from MyoVision, your handheld devices will already be bound to your SoloVision or PhysioMonitor unit.
Click through the tabbed menu below for instructions on how to set up each type of device.
Setting Up Your ScanVision

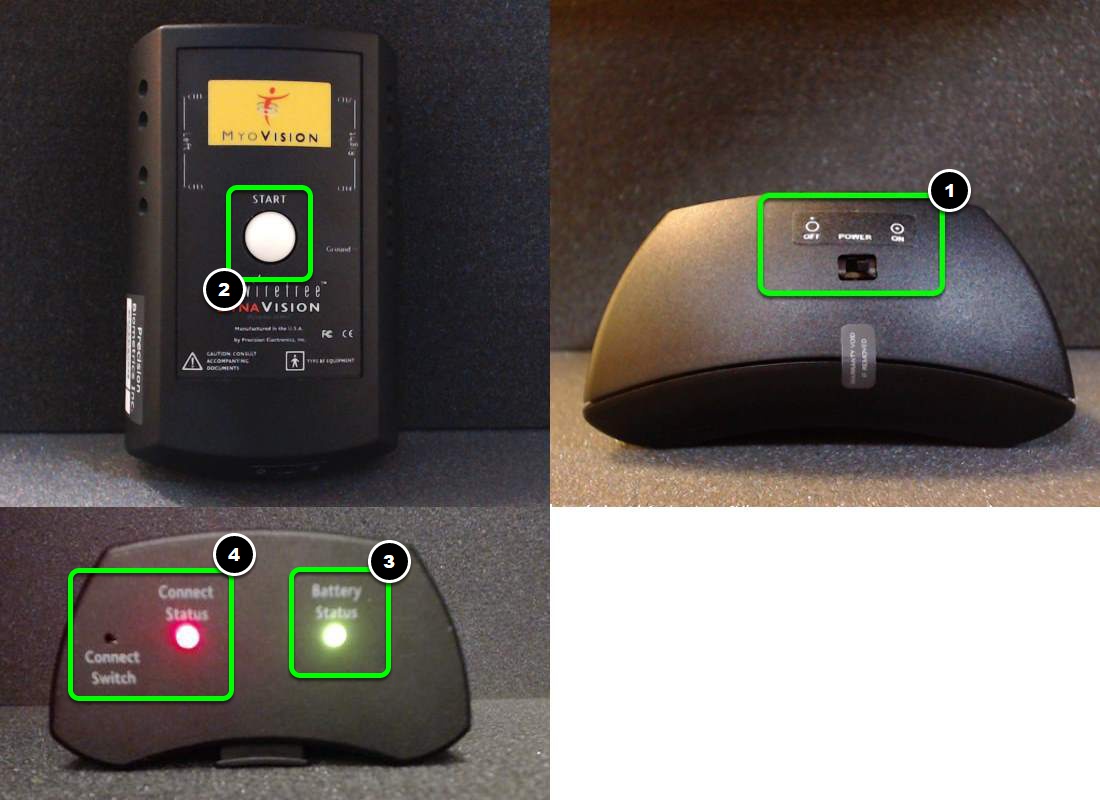
Check the Power Switch (1) to turn the device to turn on, the Power Switch must be set to the On position. The Power Switch should only be adjusted when the device is being transported or shipped to prevent the device from accidentally draining its own battery. If you are not using the device, it will automatically power itself off.
To power on the device, you will want to push the white Start Button (2), the Power and Connect Status lights (3) should turn on. You can also hold down the Start button for 10 seconds to turn the device off.
When you need to charge the device, plug the USB charging cable (included in your system if it was purchased directly from MyoVision) into the Charge Jack (4). The Charge Indicator will light up an amber color when the device is first plugged in and turn green when it finishes the charge process.
MyoVision Wirefree devices transmit data to the hub unit using a bound connection. If you purchased your ScanVision with a hub (SoloVision or PhysioMonitor), the devices should already be bound. If the Connect Status light is blinking red or you need to bind the ScanVision to another device, use the Connect Switch (6) and the instructions found in the guides listed below.
After every exam check the electrodes (6) on your ScanVision device for any signs of cracks, worn metal, or corrosion. As a general rule, we recommend replacing your electrodes each month, or after you finish a jar of QuickScan Pads. If you do not use your device regularly, regardless of the time frame, if you notice your electrodes are no longer matte grey, but rather a lighter silver color and a bit shiny, then it's time to replace them. 
If you purchased a set of ScanVision scanners directly from MyoVision, one scanner will have a yellow Left sticker (shown below). The device with the yellow Left sticker will be used to scan the left-side of the patient's back, the other device should be used on the right-side.

If you purchased a single scanner from MyoVision, the device will NOT have a Left sticker.
Setting Up Your DynaVision
When placing batteries into the DynaVision, make sure to put the red ribbon underneath the batteries before snapping them in. By pulling up on the red ribbon you can more easily remove the batteries from their clip.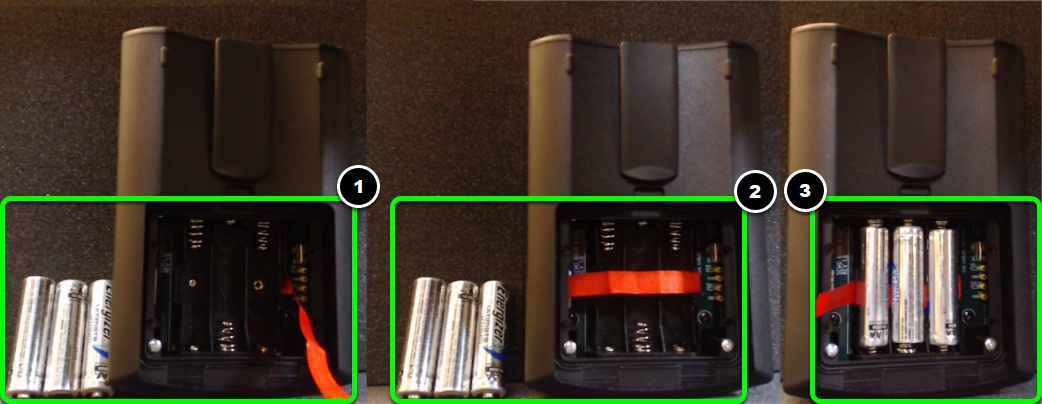
Once the batteries have been installed, put the battery cover back on. Locate the Power Switch (1) and make sure it's set to the On position. To power on the device press the white Start Button (2). When the device powers on the Battery Status (3) and Connect Status (4) lights should light up.
The last step is to get DynaROM certified. To get certified go MyoVision.com and select the DynaROM certification under the Training tab.
If the DynaVision was purchased directly from MyoVision, it will arrive already bound to the SoloVision or PhysioMonitor. However, if you need still need to bind your DynaVision, you can use the Connect Switch (4) and follow the guides below.
Setting Up Your FlexVision
To setup your FlexVision device, set the Power Switch (1) to ON. Then press the red Start Buttons (2) to power on the device. When the device powers on the Power (3) and Connect Status (4) indicators will Light up.
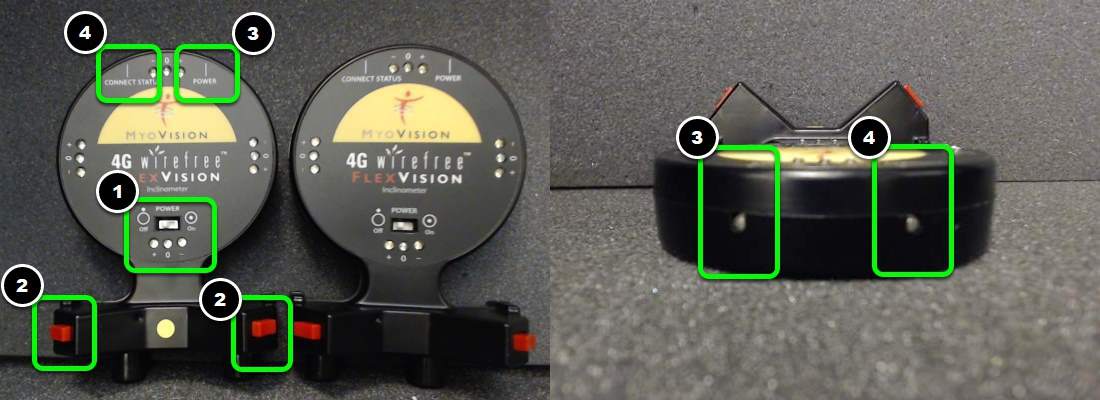
Each FlexVision device is programmed to be used in the right or the left hand. When you purchase your FlexVisions directly from MyoVision, the left hand device will have a yellow sticker between the two red Start Buttons.
By default if you purchase your system directly from MyoVision it will come bound to your SoloVision or PhysioMonitor hub. After the software is installed and the hub is plugged in, the Connect Status light should go from blinking red to solid green. (You may need to turn the device OFF and back ON after the hub is plugged in and software is installed.)
If the device is not bound to its hub, or if you need to bind your FlexVision to a different hub, click the link below that matches the hub unit you're trying to bind to.
To charge your FlexVision, plug the USB charger into the Charge Jack (1) on the side of the device. When the device is first plugged in the Charge Indicator (2) will turn amber. After the charge cycle is complete the light will turn green.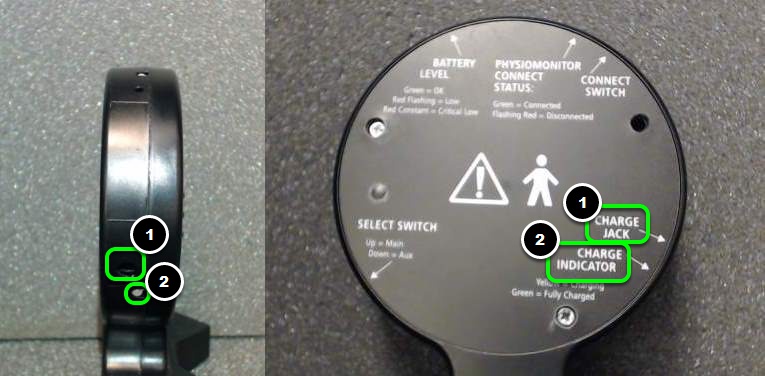
Once your FlexVision is setup, the next step is to get certified with your FlexVision by clicking the link below:
FlexUltra ROM Certification
Setting Up Your PhysioMonitor
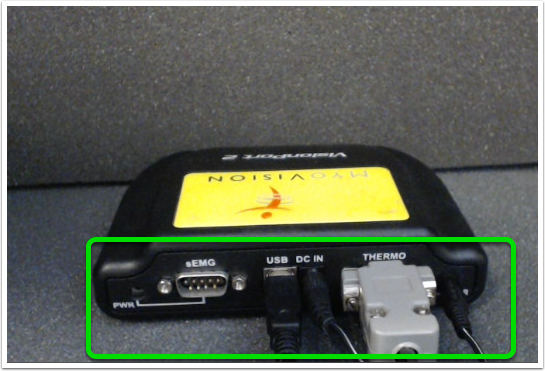
First, plug the AC Adapter into the back of the device in the DC IN (1) port. Then, flip the Power Switch (3) to the ON position. Plug the USB cable into the back of the PhysioMonitor in the USB to PC port (2), and into your computer. Once the device is on and the USB cable is connected to both the PhysioMonitor and the computer, the Power (4) and Computer Connect (5) lights should both be green.
Note that if you are using a desktop computer, it is highly recommended that you plug the USB cable into the USB ports on the back of the computer.
If device is not connecting properly, check that the drivers for the PhysioMonitor hardware were installed properly. This process is called "enumerating." Depending on the speed of your computer the PhysioMonitor can take up to 5 minutes to enumerate.
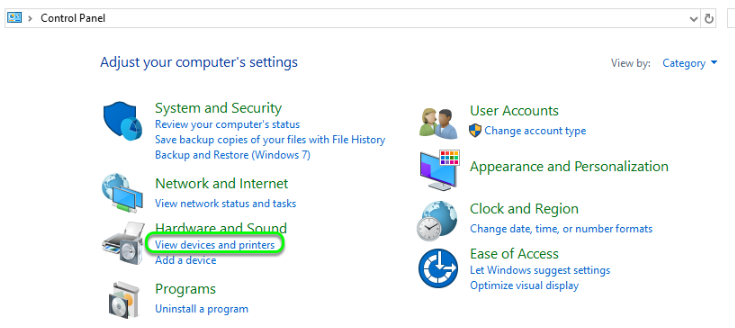
To check that the drivers were installed and the hardware was recognized, follow the steps below:
- Open the Control Panel
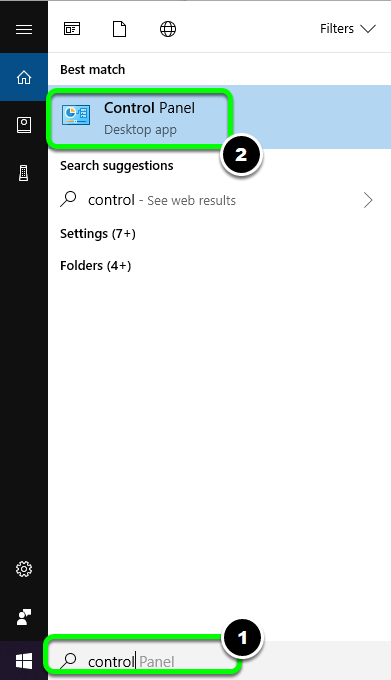
- When the Control Panel opens, select the View Devices and Printers option.
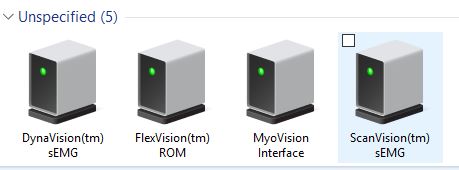
- If the drivers were installed properly the following devices should be listed under the Unspecfied category.


If you're experiencing issues getting the drivers to install properly, check if the port your using is a USB 2.0 or 3.0 port (most computers mark the USB 3.0 ports by making the port blue in color). The PhysioMonitor requires a USB 2.0 connection.
Setting Up Your SoloVision
To connect your SoloVision to your computer, insert the USB cable into the USB to PC port (1) on the back of the SoloVision and the other end of the USB cable into your computer. SoloVision units receive power directly from the PC and do not come with a power cable.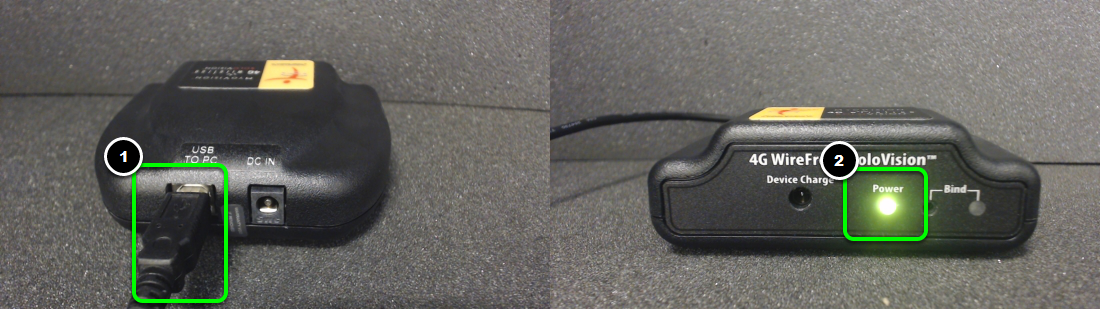
Once the SoloVision is connected to your computer, the power indicator (2) on the front of the SoloVision will turn green.
Follow the steps below if you are having trouble getting your computer to recognize the SoloVision:
- Make sure the USB cable is fully plugged into the SoloVision and the PC.
- Make sure the USB cable is plugged into a USB 2.0 port and NOT a USB 3.0 port.
- When the SoloVision is first plugged into the PC it will need to install the drivers for the SoloVision. This process happens automatically and is called enumerating. It can take up to 5 minutes for the SoloVision to fully enumerate.
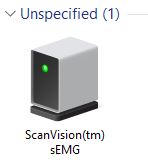
- Open up the Control panel then click on the View devices and printers option.
- Once Devices and Printers opens, there should be an icon under Unspecified category with a name that matches the type of device the SoloVision connects to. In the below example, the SoloVision that is connected to the PC can only bind to ScanVision devices that is why the Unspecified device is a ScanVision.
In the video below David Marcarian demonstrates how to set-up a SoloVision.

How to Connect a VisionPort2
This section will show you how to plug in and connect your VisionPort2 to the computer.
- Plug the power cable into a working outlet in the wall or in a grounded surge protector. Plug the the other end of the power cable into the VisionPort2.
- Plug the device power cable into the jack on the VisionPort2 and onto the split serial cable of the ThermoGlide.
- Make sure that the serial cable of the ThermoGlide is plugged into the VisionPort2.
- The "Ready" light on the VisionPort2 should turn a solid green.

How to Connect a Wireless ThermoVision
This section will show you how to plug in and connect your Wireless ThermoVision.
Make sure that your hub unit (either a SoloVision or PhysioMonitor) is plugged into the computer and that the software is running.
- Flip the Power switch on the ThermoVision to "On" and pull the trigger to start the device.
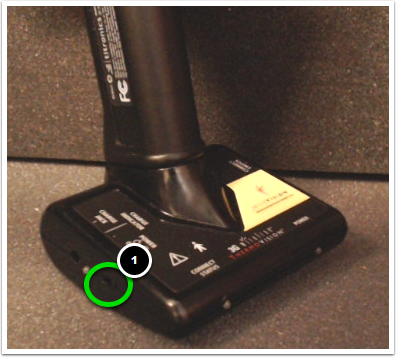
- The "Power" and "Connect Status" lights should both light up and stay a solid green.
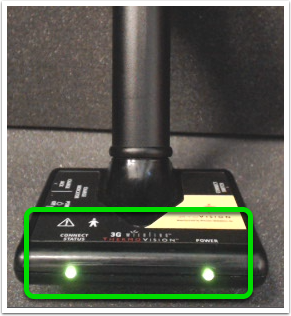 If the "Power" light is red or flashing, plug the ThermoVision into the charger and let it recharge before attempting to connect it again.
If the "Connect Status" light is flashing red, the ThermoVision will need to be paired to the hub unit. The links below will take you to MyoVision Support Guides that show how to pair devices to the different types of hubs. - Once both lights are solid green the device is connected and ready for use.

 If the "Power" light is red or flashing, plug the ThermoVision into the charger and let it recharge before attempting to connect it again.
How to Connect the USB C-5000
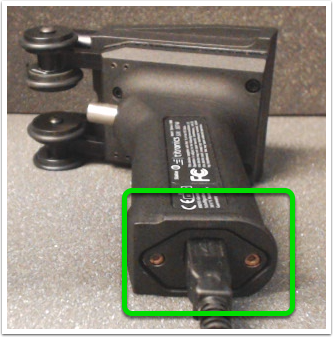
This section will show you how to plug-in and connect your USB C-5000.
- Plug the squared end of the USB cable into the USB C-5000 unit and the other end into an available USB port on the computer.
- Once the device is plugged in, perform a test exam.
