This support guide discusses the cause of the SQL error that may occur when trying to restore a MyoVision database backup and how to fix it. If you are unsure whether this is the SQL error you are receiving, check to see if the error matches the text that's highlighted in them image below: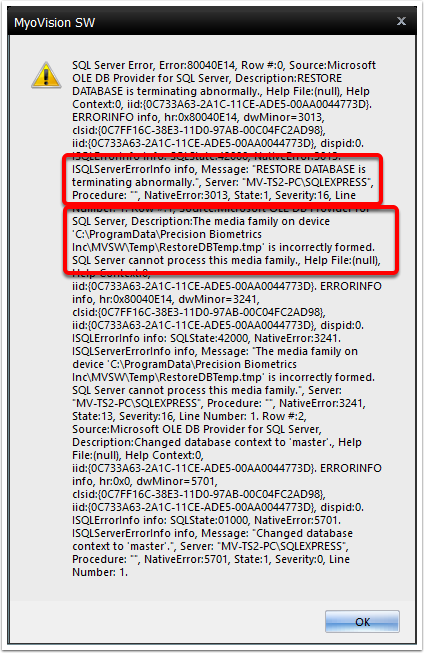
This error occurs when you try to restore a database back into an SQL server that is already running an older version of SQL.
For example: if you create a database backup while running SQL 2014 Express, then you try to restore the database backup while running SQL Server 2008 R2, you will receive the error message show above.
Table of Contents:
Step 1: Install SQL Server 2014
These instructions will guide you through the process of SQL Server 2014.
1. Close all programs and make sure your Windows operating system is up to date.
SQL Server Installation Guide
The following steps will guide you through the process of installing SQL Server.
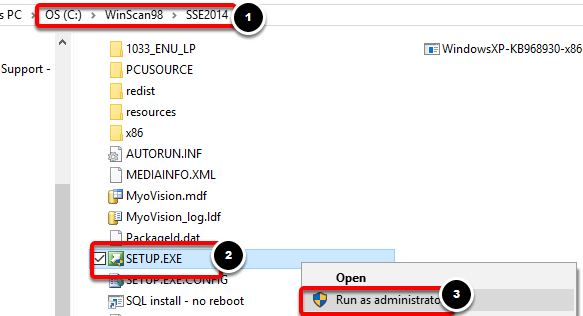
- Go to your C: Drive and open the WinScan98 folder. Then open the SSE2014 folder. Right click SETUP.EXE and select "Run as administrator." You will need to run the setup as an administrator in order for it to install properly.
 If you cannot locate the folder titled "SSE2014" click the following link to download SQL Server 2014 Express from Microsoft.com.
https://www.microsoft.com/en-us/download/details.aspx?id=42299
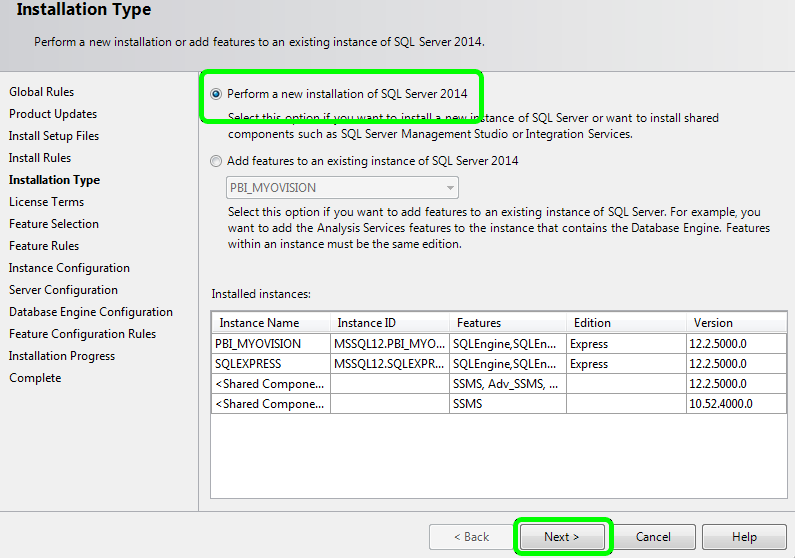
- Choose to do a new SQL Server installation.

- Choose to perform a new installation. Then click Next.
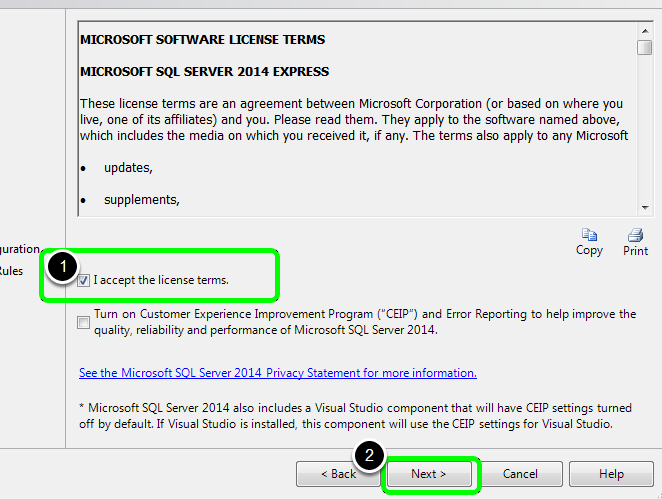
- After the installer runs its checks, check the box next to I accept the license terms.
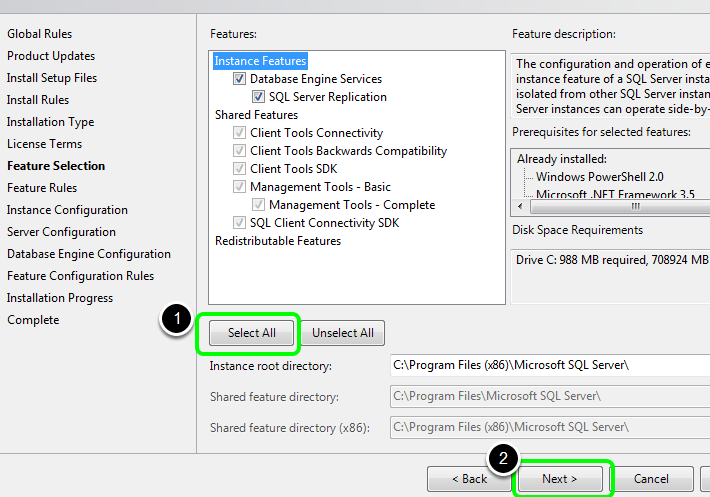
- On the Feature Selection screen click the Select All button, then click Next to continue.
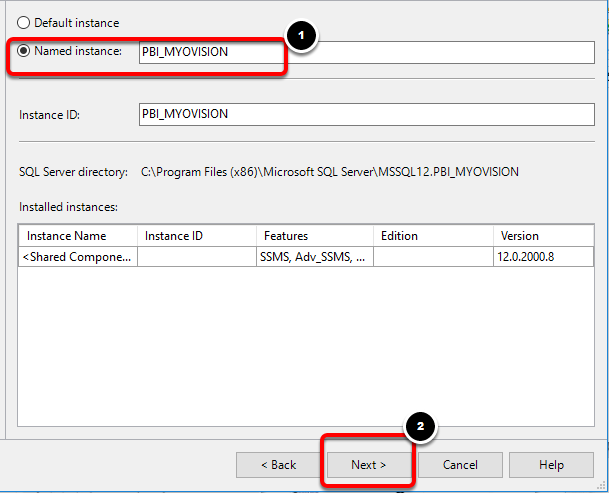
- On the Instance Configuration screen select the Named Instance option. Enter PBI_MYOVISION as the name. When you click out of the Named Instance, the Instance ID should automatically set itself to match the Named Instance. Click Next to continue.
- Make sure the Startup Type for SQL Server Database Engine is set to Automatic.
If you are running a network database, the SQL Server Browser should also be set to Automatic. Then click the Next button.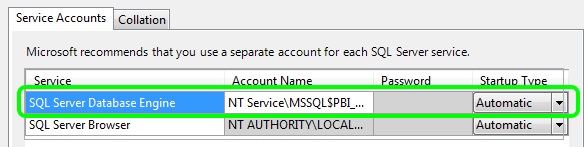
- If you will be using a local database select Windows Authentication Mode and Mixed Mode if you are using a network database.
For Mixed Mode the password should be "MyoVision01".
- Under the Specify Server administrators click the Add button, then in the Select Users or Groups Window select Advanced.
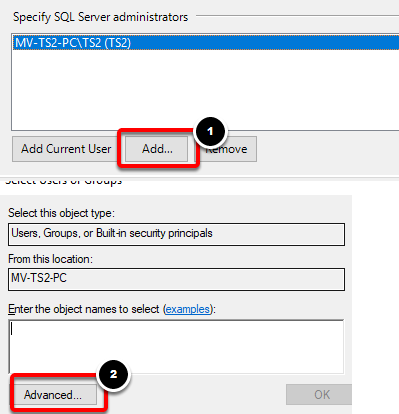 When the Advanced window opens, click the Find Now button. In the list of Search Results that populates at the bottom of the windows, select the the Users option. Then, click OK to add users to the list of Server Administrators. Click OK again on the select Users or Groups window. Then Next in the SQL Server 2014 installer to proceed.
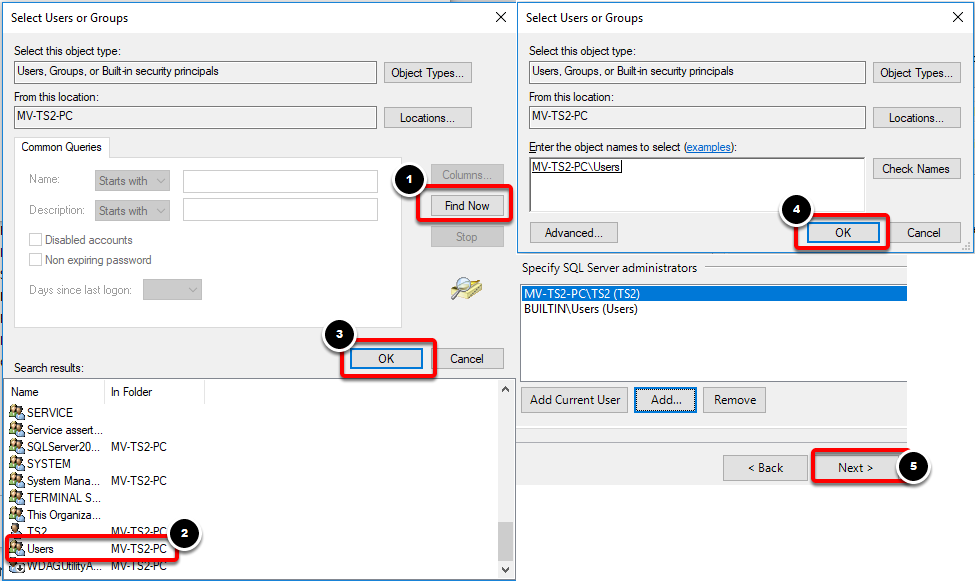
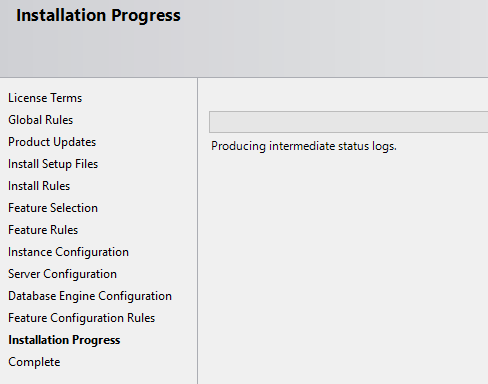
- At this point the installer will use your server configurations to install your SQL Server.
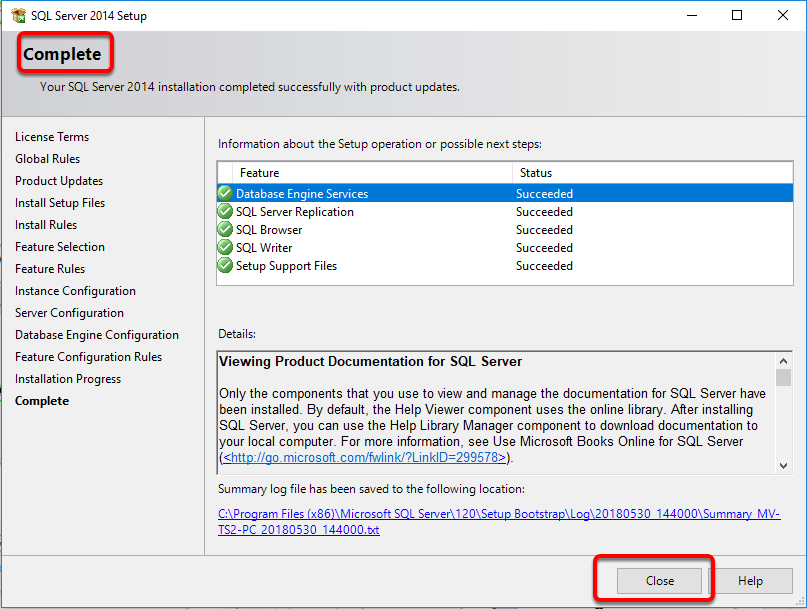
- When the installation is complete click the Close button to exit out of the installer.
 If you cannot locate the folder titled "SSE2014" click the following link to download SQL Server 2014 Express from Microsoft.com.


 When the Advanced window opens, click the Find Now button. In the list of Search Results that populates at the bottom of the windows, select the the Users option. Then, click OK to add users to the list of Server Administrators. Click OK again on the select Users or Groups window. Then Next in the SQL Server 2014 installer to proceed.


Tutorial Video
If after reading through the steps above you aren't certain how to perform the installation, watch the video below for a quick tutorial on installing SQL Server 2014.
Step 2: Attach Data File
After you've installed SQL Server you will need to attach a MyoVision data file to your SQL service:
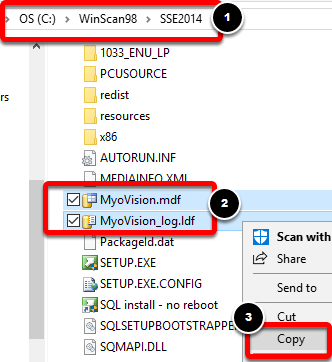
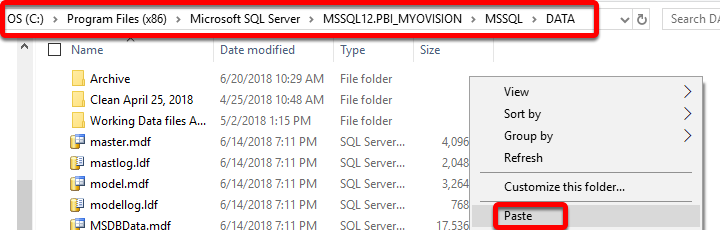
- Navigate to C:\Winscan98\SSE2014\. Hold down the "ctrl" (control) key on the keyboard and select the MyoVision and MyoVision_log files. Right-click and select Copy.
- Navigate to C:\ProgramFiles(x86)\Microsoft SQL Server\MSSQL12.PBI_MYOVISION\MSSQL\DATA\ the folder may also be MSSQL10.5.SQLEXPRESS if you have an older version of SQL Server installed. Right-click in the DATA folder and select Paste.
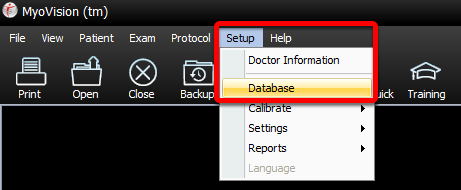
- Open the MyoVision software. Click the Setup menu and select Database.
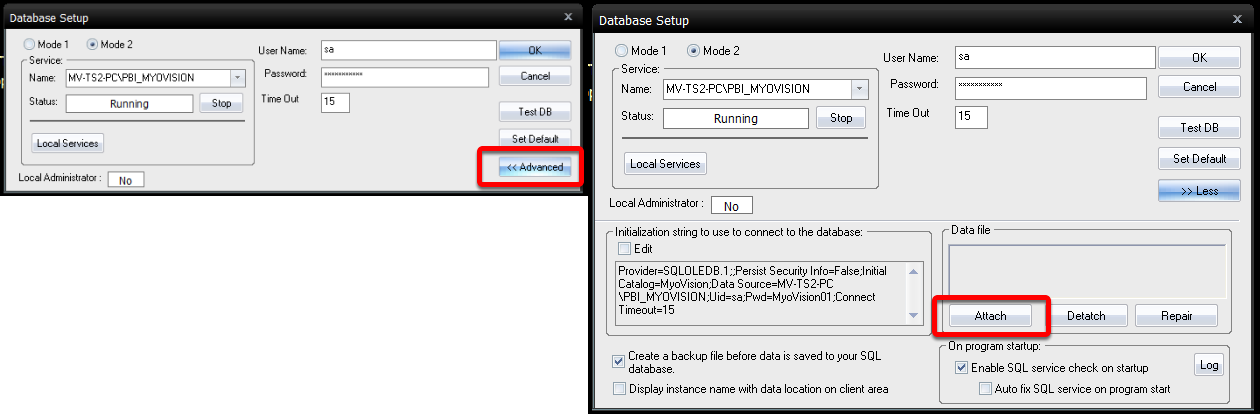
- Click the Advanced button, then click the Attach button.
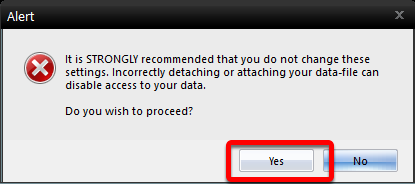
- When the alert pops up select Yes.
- Navigate to the location where you previously pasted the MyoVision and MyoVisio_log files to in Step 2. Select the MyoVision file and click Open.

- If it was successful, the software will tell you that the data file is attached.


Step 3: Restore Backup File
Now the software is ready for you to restore the database backup file.
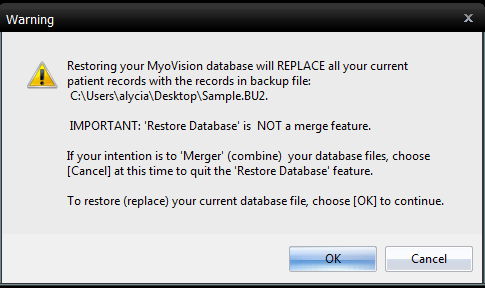
IMPORTANT: When restoring a backup file, all patient data currently saved in the MyoVision database will be deleted and replaced with the data in the backup file. If you need to restore a backup file on a computer that already has patient data on it, or if you are trying to merge two databases together Click Here to see our guide on How To Merge Multiple Databases**
- Open the MyoVision software and go to the File menu, select Restore Exams.
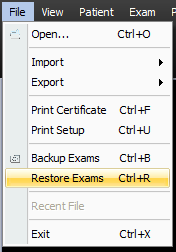
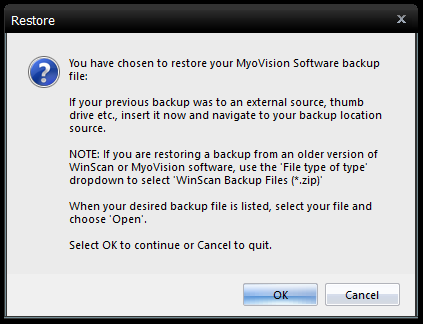
- A warning will pop-up notifying you know that restoring a backup will erase your current database and replace it with the database inside of the backup. Click OK if you wish to continue.
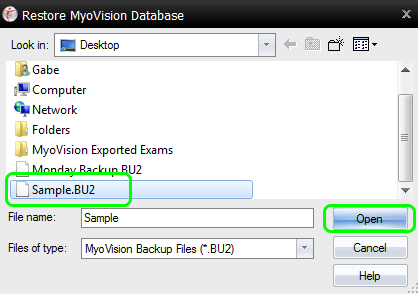
- In the window that opens, navigate to the location where your backup is saved. Select the backup file, then click Open.
- Another warning prompt will appear notifying you know that by restoring this backup you will be erasing all of the exams currently in your database. Click OK if you wish to continue.
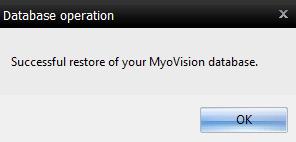
- You will then receive a prompt on whether or not the restore was successful.
- Open an exam to verify that your database has been restored.


