Summary
This article will walk you through setting up your ThermoVision T2 for the first time.
Looking for instructions for how to install and use PhotoScape X? Click HERE to see our section on 'Comparing multiple images'
Before you Begin
- Make sure your computer has a current version of Windows OS.
- For Windows OS and PC requirements, see our webpage https://myovision.com/pc-requirements
How to Set Up your T2 System
1. Installing the T2 Software
- Go to https://myovision.com/products/t2/t2-resources/ and click on the red "DOWNLOAD" text. This will begin downloading the software onto your computer. This make take several minutes depending on computer speed.
- Once the software is downloaded, the browser should indicate that the software has been downloaded at the top right corner of the window:
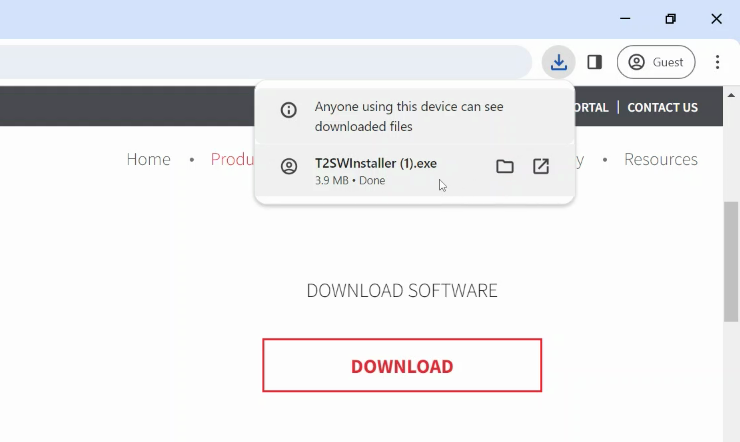
- Next, left click on the the blank part of the tab, or on the text that says "Open File" (if using Microsoft Edge) to run the T2 software. If using an older browser, the popup may appear at the bottom of the browser as such:


- After left clicking "Open File" or "Run", the T2 software will begin installing. If prompted with a notification window in the center of your screen asking "Do you want to allow this app to make changes to your device?", left click "Yes" to continue.
- The installation wizard will then appear on the screen.
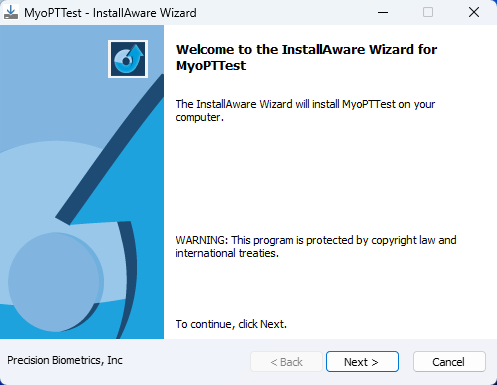
- Click "Next" through each window in the MyoPTTest InstallAware Wizard and click "Finish" on the last window. After clicking "Finish", the T2 software will open.

2. T2 Device & Wireless Remote Setup
- The following items are required to connect the T2 to your computer:
- The ThermoVision T2 device
- Included USB Cable
- Included USB-C to USB-A adapter (optional)
- First, connect one end of the included USB cable to the T2. Next, if your computer doesn't have a USB-C port, connect the included USB adapter to one end of the cable, then plug it into the computer.
- Note: The order in which the cable is connected is not important.
- When disconnecting the USB cable from the computer, you may leave the USB adapter plugged in.
- Once the T2 is connected, open the T2 software. The software should show a solid blue or white screen if the camera is not pointing at a heat source (the color will vary depending on the color selected in the Pallet in the software).

- To make sure the T2 camera is functioning, point it at a heat source or extremity, like a hand or foot. The object will appear on the screen.
Wireless Remote Setup
- Included with the T2 system is a Wireless Remote used for taking pictures with the device. The Wireless Remote has a small USB Bluetooth adapter inserted in the bottom, which needs to be removed and plugged into your computer for it to function with the T2.

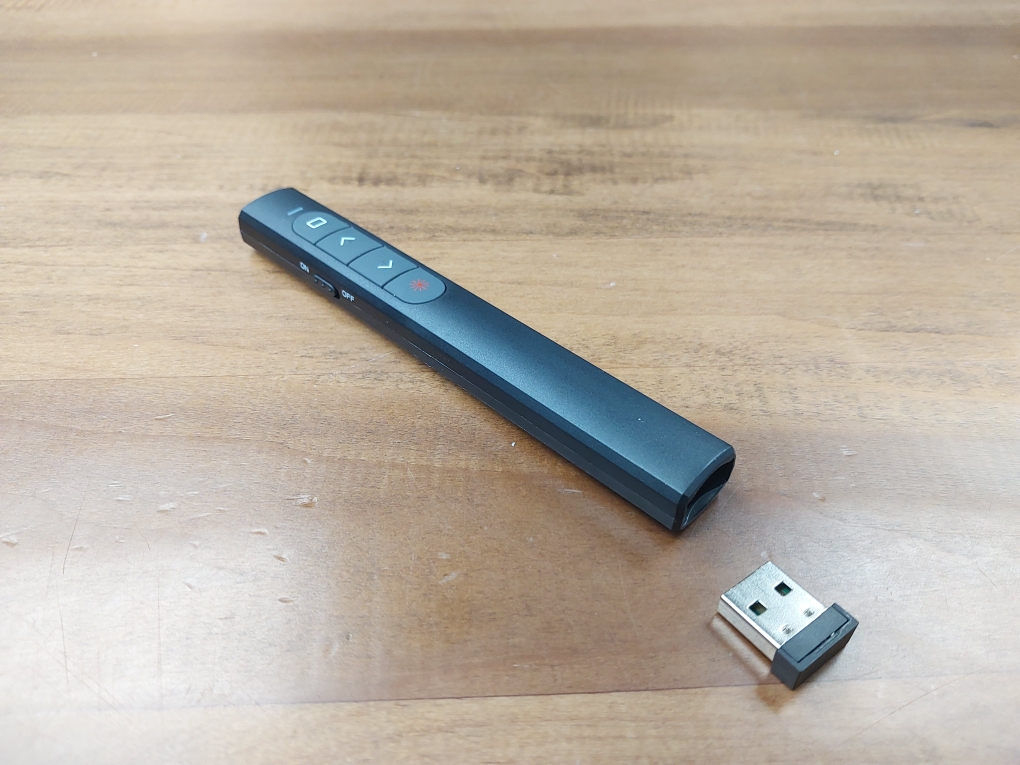
- After plugging the USB Bluetooth adapter into the computer, make sure that the Wireless Remote is powered on. The On/Off switch can be found on the left side of the remote.


3. Using Your T2
- To begin taking thermal images with the T2, open the T2 software. With the T2 device plugged into the computer, the software will display a blank white screen:
![]()
- To verify that the camera is working, point the T2 at an extremity or heat source to view the image. For example, in the image below, the T2 camera is pointed at a hot cup of water:

- We can see how the heat is concentrated towards the bottom of the coffee cup because it is only half full. Notice, also, how the heat radiates from the hot water and how the temperature is cooler towards the edges.
Changing Color Pallett & Temperature Scale
- To change the color of the image, choose between the color options in the Palette. The default is Iron Black and the MyoVision is the second main color, however, the color of choice can be set to personal preference. The color does not affect the readings of the T2.
- To change the temperature unit of measurement, select Fahrenheit or Celsius under the "Temperature Scale" field.
Measuring Temperature
- To measure the temperature of an area, move around the temperature Target. This is the 2x2 grid seen in the T2 software. To display the target and the temperatures, check the 3 checkboxes in the "Temperature Target Value" field. The temperature values only display the temperature of the pixels (the area) inside the target.
- The target can be moved by left clicking inside the grid and dragging it to the desired location. The target can also be resized by moving the cursor to the edge or corner of the target and dragging in or out. There is also a manual option to do this by clicking the "Size and Position" button in the "Temperature Target Value" field.
- Note how the temperatures in the top left corner change as the target is dragged from the background area to the hot area on the cup:

- To restore the default layout at any time, click the "Load Defaults" button on the right.
Taking A Picture With The T2
- To take a picture of a patient, make sure to first enter their information. Enter their first and last name, and then assign the patient an ID (optional). Patient IDs may be assigned using your preferred method. Lastly, enter the name of the region, such as "Full Back", "Hands", etc.
- Next, there are 2 methods to take a photo with the T2.
- Point the T2 at the desired object. If the target is on the object in the image, do not worry, as the target can be moved after the picture is taken. In the T2 software, click the "Capture Still" button. An audible shutter 'click' will sound and the photo will appear in the T2 software. The time and date appear in the bottom left corner of the software and the Palette selection in the bottom right.
- To set a Capture Delay, enter a value from 1-10 seconds in the field to the right of "Capture Delay". This allows time to position the T2 at the desired angle before the image is captured.
- Grab the T2 and Wireless Remote. Point the T2 at the desired object. If the target is on the object in the image, do not worry, as the target can be moved after the picture is taken. When ready, press the down arrow button on the Wireless Remote to take a picture. An audible shutter 'click' will sound and the photo will appear in the T2 software. The time and date appear in the bottom left corner of the software and the Palette selection in the bottom right.
- Point the T2 at the desired object. If the target is on the object in the image, do not worry, as the target can be moved after the picture is taken. In the T2 software, click the "Capture Still" button. An audible shutter 'click' will sound and the photo will appear in the T2 software. The time and date appear in the bottom left corner of the software and the Palette selection in the bottom right.

Saving Your Captures
- To save a picture, click the "Save to File" button. The File Explorer window will then open to one of the folders on the computer. Choose a folder of choice and the click "Save" at the bottom right corner of the File Explorer window. In the following steps we will demonstrate how to create a folder for storing captures if not set up yet.
- To organize saved pictures, we recommend creating a folder structure in the File Explorer:
- Open File Explorer if not already open. Next, choose one of the default folders in the File Explorer for the new folder. For example, choose the "Documents" folder, or choose the "Desktop" folder to automatically access the folder from the Desktop.
- In a blank area in the File Explorer window, right click and select New > Folder from the drop down menu. Next, name the folder something easy to reference, such as "T2 Scans" or "T2 Exams".
- Press Enter or simply left click in the blank space again to save the folder name. Once the folder is created, click the folder to enter it. Next, we can choose to store all the exams in this folder, or we can create folders named A-Z. A shortcut to create a new folder is to press Ctrl + Shift + N at the same time on the keyboard.
- Once saved, your image will be stored in the designated folder and it can be accessed any time via the T2 software or through the File Explorer.
- The Save to File Reminder may be unchecked if you do not want the software to ask when starting a new exam
- To take a new picture: After saving the picture, click on Start New Exam. If the Start New Exam button is clicked without saving your image, the software will ask if you want to continue without saving.

Importing Images Into The T2 Software
- To import pictures into the T2 software, click the Import from File button. The File Explorer will open to the folder where the exam was saved. If the correct folder is not selected, choose the one created to organize your exams. Select the exam of choice, and click open at the bottom right of the File Explorer window.

- Once the image is imported, the image and the patient's information will be visible in the Patient Info fields.
Comparing Multiple Images
- To compare multiple images for a patient, a separate program called PhotoScape X (free version) is required. This program can be found and downloaded in the Microsoft store.
- To open the Microsoft store, search for Microsoft Store in the Windows search bar on the taskbar. If the search bar is not visible click on the Windows icon and the app should be listed in the menu. If it isn't listed, begin typing Microsoft Store and the search bar should appear with the desired result.
- Once in the Microsoft Store, search for Photoscape X, and select the free version from the choices. After selecting the app, the following should appear:

- Click on Get or Install, and the installation process will begin (this may take several minutes depending on your computer and/or internet speed).
- Once the program finishes installing it will automatically open.
- If the program doesn't automatically open, there may be a notification on the bottom right of the screen asking to launch the program. Click Launch to open it.

- From the top menu, select the Combine tab go to open the image viewer.
- Once opened, the File Explorer folder will be visible on the left. Navigate to the folder where the T2 scans are stored.
- Once in the desired folder, hold left click and drag an image of choice to the area marked "Drop your photo here".
- You can drag and drop multiple images into the area.

- Multiple images can be compared side by side.
- At the top right, there are buttons to stack the photos horizontally or vertically depending on your preference.