Summary
This article will take you through the common SQL Server errors that you might encounter while working with the MyoVision software.
Before You Begin
- Make sure that you' re running the newest version of our software by heading over to our Download Page, and selecting the Download Now. The newest versions include built-in fixes for many of the SQL Errors that customers experienced in previous versions.
- Check to make sure you have logged in as an administrator on your computer. If you are unsure, follow the instructions on this site to find out. Are you an Administrator?
- Close all programs and windows before beginning, including error messages and other dialogue boxes. Your computer should be in a neutral state.
- If you are unsure which error to address, start at the beginning as it will walk you through them all.
Table of Contents
- SQL Server Error 80004005
- SQL Server Error Code 10
- SQL Server Error Code 20
- Installing SQL Server Without Internet
- SQL Server Error - Database Listed as " In Recovery"
- Edit Permissions of SQL Server Folder
- Are Your SQL Files Compressed?
- Additional Recommendations with SQL Server
- Advanced: Edit SQL Security Permissions
- Advanced: SQL Server Error - MSXML Error on Install of Software
SQL Server Error 800040E104
If you are receiving the "SQL Server Error 800040E104" the software is attempting to create a "Daily Backup" file, but being blocked. Typically this is because a folder necessary to create the backup is not set up to give access to the folder.
The instructions below will show you how to fix the permissions issue.
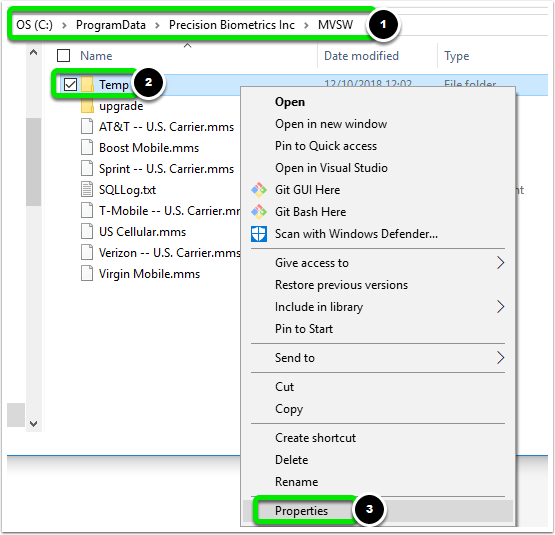
- Open "File Explorer". Make sure that the "Hidden Items" checkbox under the "View" tab is checked.

- Navigate to the "OS(C:)" folder. Open the "ProgramData" folder, open the "Precision Biometrics Inc" folder, and the "MVSW" folder. Right-click the "Temp" folder and select "Properties".
- When the Properties window opens click on the "Security" tab, then click on the "Edit" button.
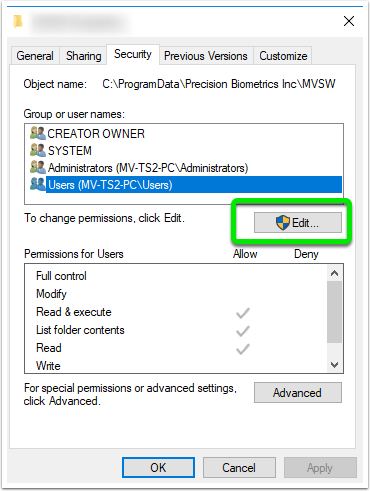
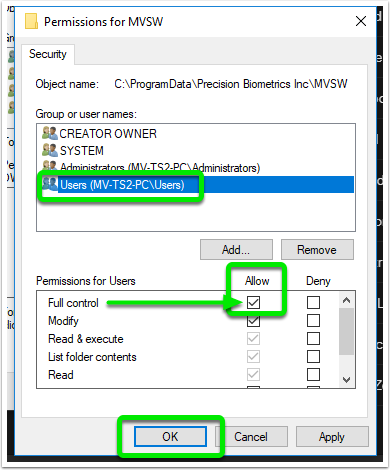
- If "Users" is listed click the "Allow" for "Full control," then click "OK".
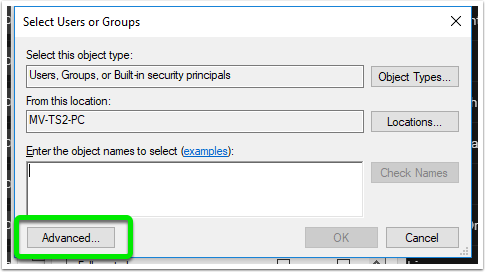
If "Users" is not listed Click Here to continue troubleshooting.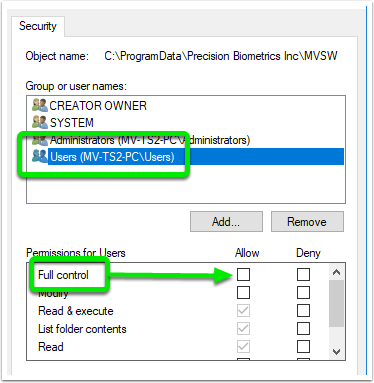
- In the "Select Users or Groups" window, click the "Advanced" button.
- Click the "Find Now" button, locate "Users" in the "Search results:", and click the "OK" button.
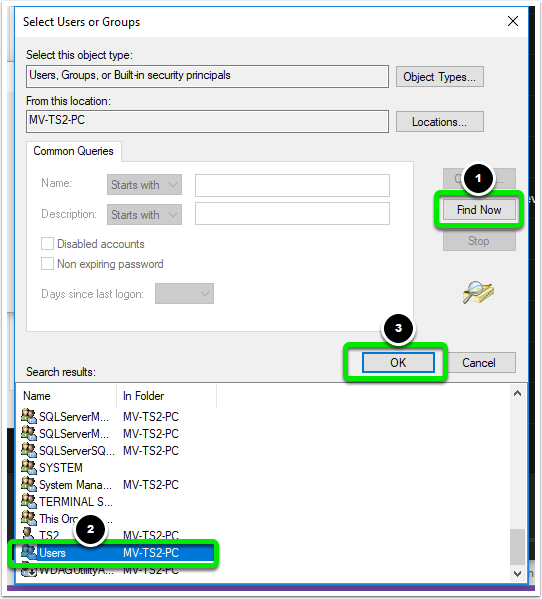
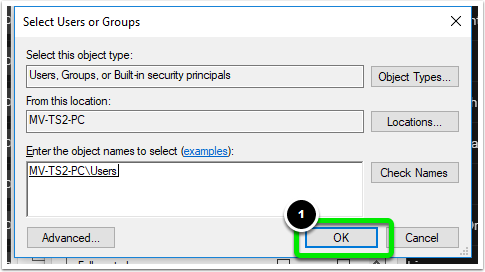
- You should see "Users" now listed in the "Select Users or Groups" window. Click the "OK" button.
- Select "Users" from the list, left-click the "Allow" box for "Full Control" to put a check mark in the box. Then, click the "OK" button.


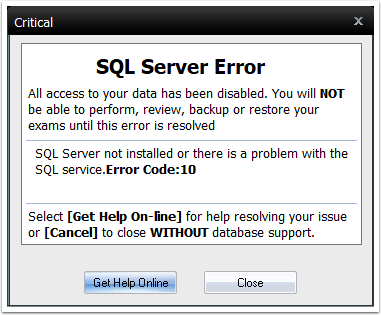
SQL Server Error Code 10
If you are receiving the SQL Error Code 10, you will want to check that your SQL Service is installed an that it' s running.
Follow the steps in the tabbed guide below to troubleshoot an SQL Server Error Code 10.
**Make sure to restart your computer after you've finished made any changes to the SQL Server, **
Step 1: Check the Status of the SQL Server
MyoVision uses a Microsoft program called SQL to save data. The first step will demonstrate how to check that this program is running and installed.
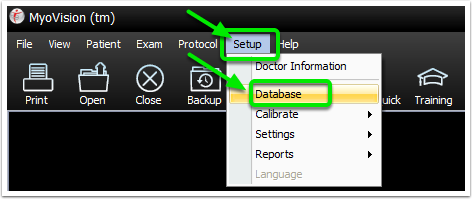
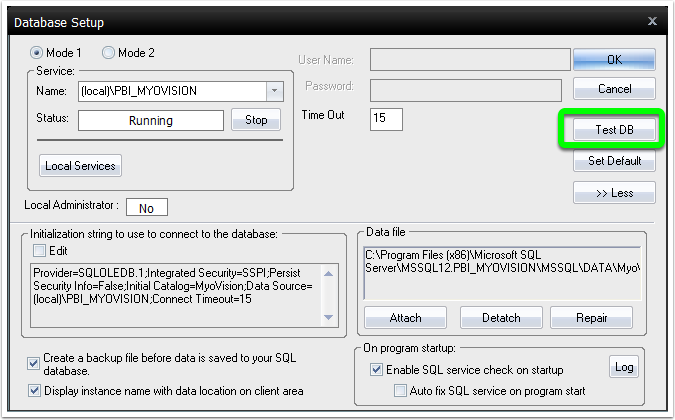
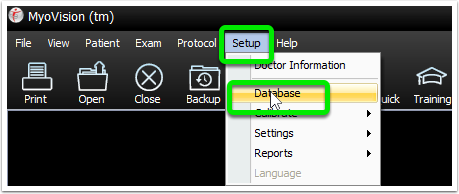
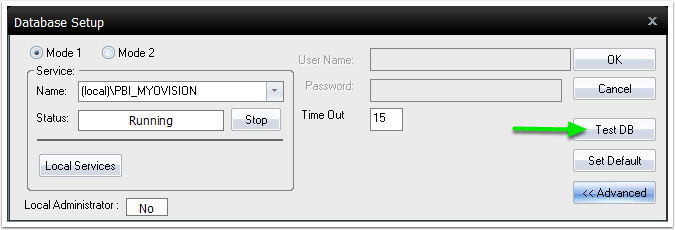
- Click "Setup" at the top of the software and select the "Database" option.
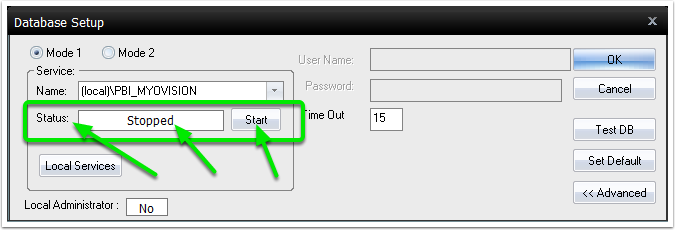
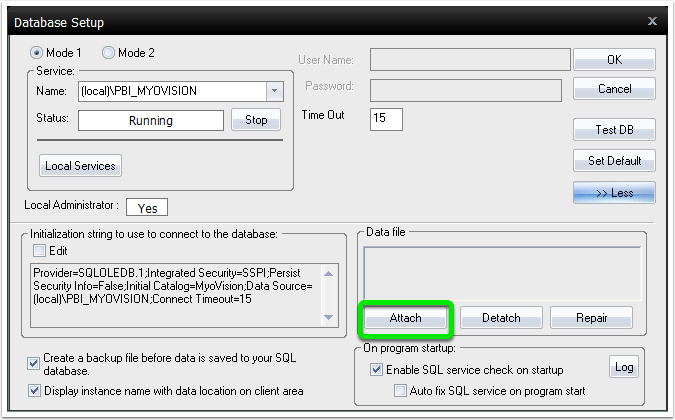
- The following window will pop up. If you are running the current version of the MyoVision software check the "Status" box to make sure it is marked as "Running" if it is not, click the "Start" button.
 If you are running an older version of the software, click the Local Services button.
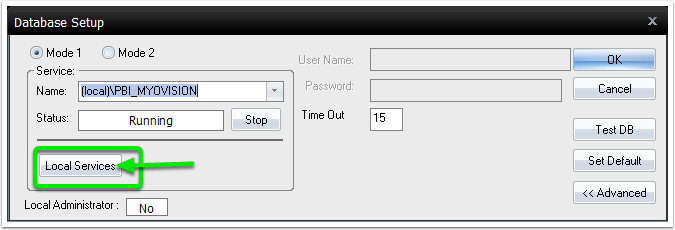 Click "Yes" when the Alert pops up.
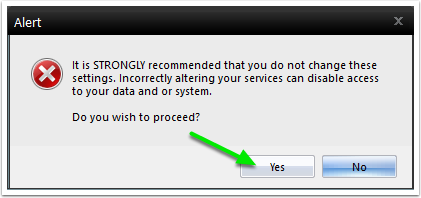 Locate the service in the list with the name SQL Server (PBI_MYOVISION) or SQL Server (SQLEXPRESS). Left click the SQL Server and select Start on the left side of the window.
- If you can't locate your service or the "Status" inside the software is marked as "Not Installed". You will need to re-install SQL Server onto your computer. For more information on how to install SQL Server continue to Step 2
- Make sure to test your database by clicking the "TestDB" button inside the software.
If everything is working properly the following message will appear.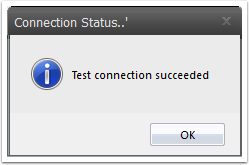

 If you are running an older version of the software, click the Local Services button.
 Click "Yes" when the Alert pops up.
 Locate the service in the list with the name SQL Server (PBI_MYOVISION) or SQL Server (SQLEXPRESS). Left click the SQL Server and select Start on the left side of the window.


Step 2: Re-Install SQL Server
Before re-installing SQL Server, make sure that you follow the instructions in the Upgrade Your MyoVision Software guide to make sure you are running the most recent version of the MyoVision software.
- Open File Explorer.
 Navigate to C:\WinScan98\SSE2014\ right-click the "SETUP.EXE" file and select "Run as Administrator."
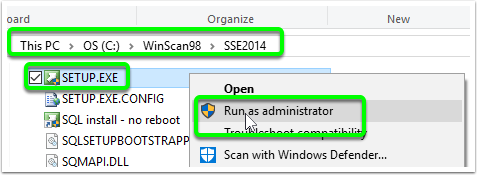
If you can't find this folder on your computer, Click Here for instructions on how to download SQL Server 2014 Express from Microsoft's website. - Click "New SQL Server standalone installation."
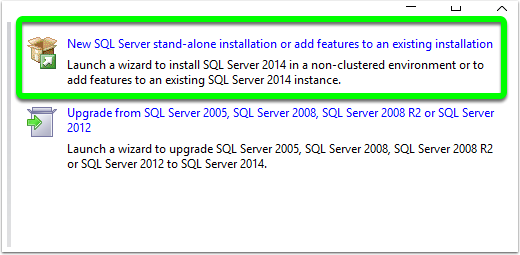
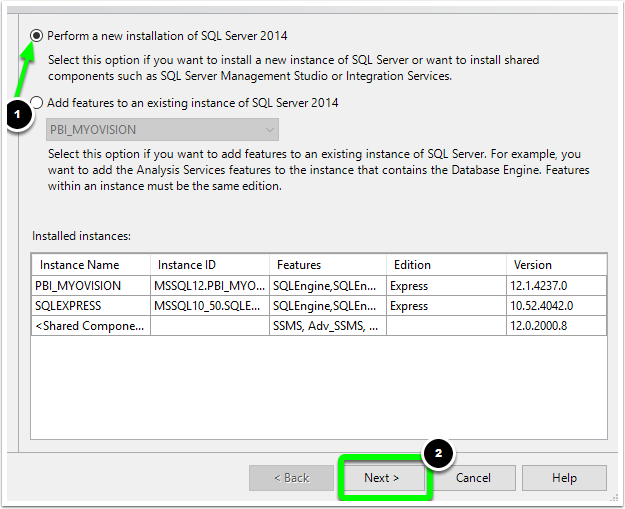
- The Program will run the setup process. When you are asked whether you want to perform a new installation or upgrade an existing installation, select to perform a new installation. Click "Next" to continue.
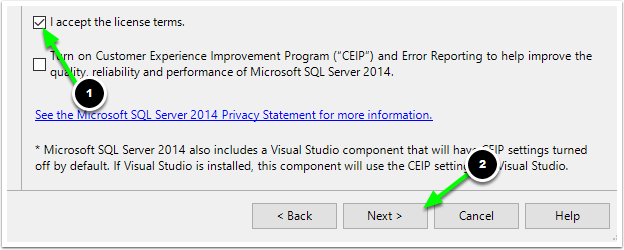
- You will need to check the "I accept" box and click "Next" to continue.
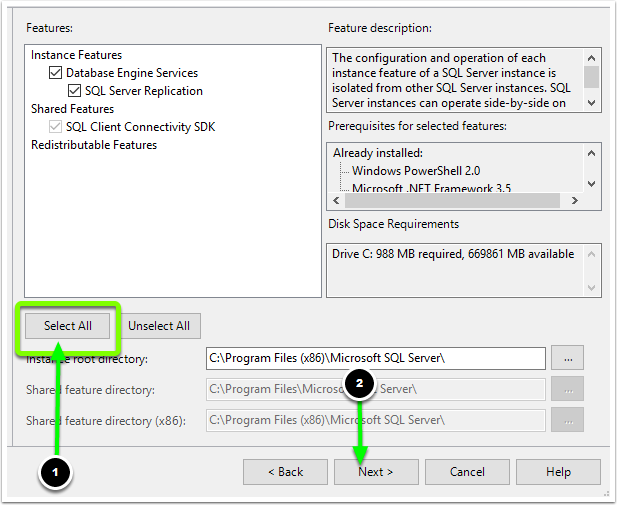
- You will be prompted to select which features you want to install. Click the "Select All" button, then click "Next" to continue.

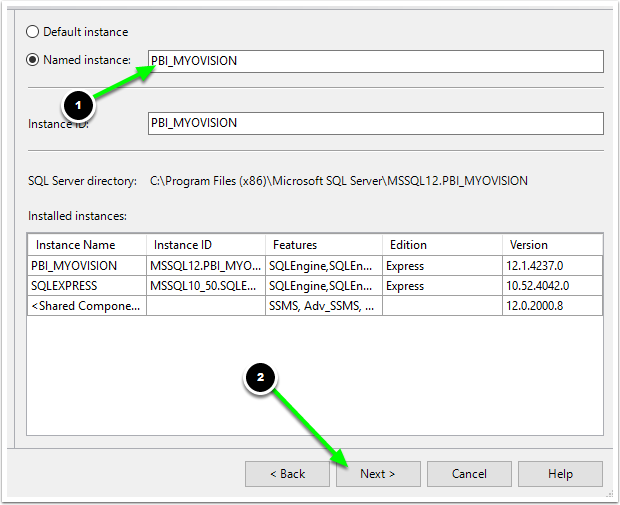
- In the name Named Instance box type "PBI_MYOVISION". Then, click "Next" to continue.
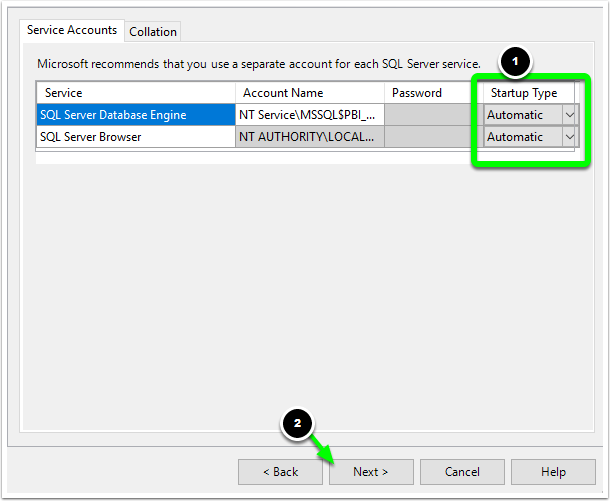
- Make sure both "Startup Types" are set to "Automatic" and click "Next" to continue.

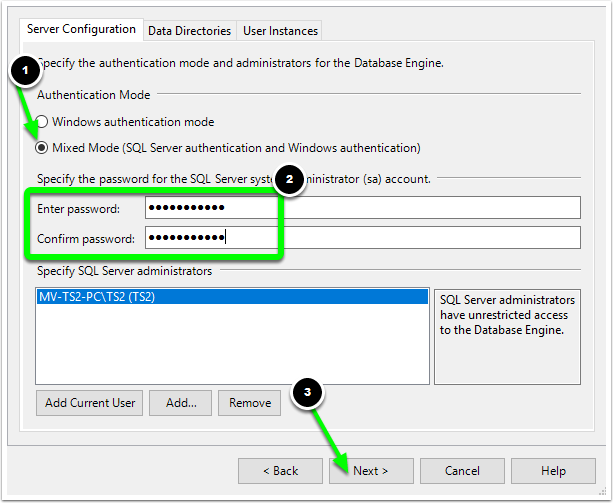
- Set the "Authentication Method" to "Mixed." Enter "MyoVision01" into the "Enter Password" and "Confirm Password" boxes.
- The SQL Server will now complete the installation.
 Navigate to C:\WinScan98\SSE2014\ right-click the "SETUP.EXE" file and select "Run as Administrator."


Step 3: Add Your Raw Data File
This step will show you how to add the MyoVision data file the SQL Server installed in (Step 2).
- Open File Explorer and navigate to C:\WinScan98\SSE2014\ folder.
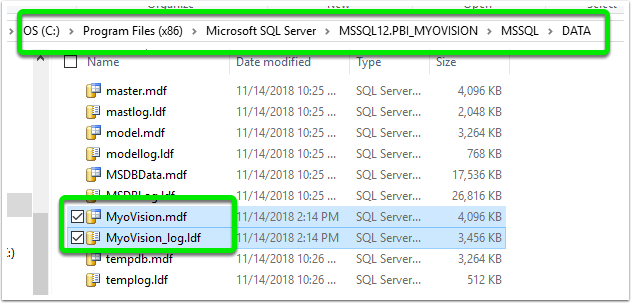
Locate the "Myovision.mdf" and "Myovision_log.ldf" files. While holding down the "Control" key on the keyboard click on the "Myovision.mdf" and "Myovision_log.ldf" files to highlight both of them. Right-click and select "Copy."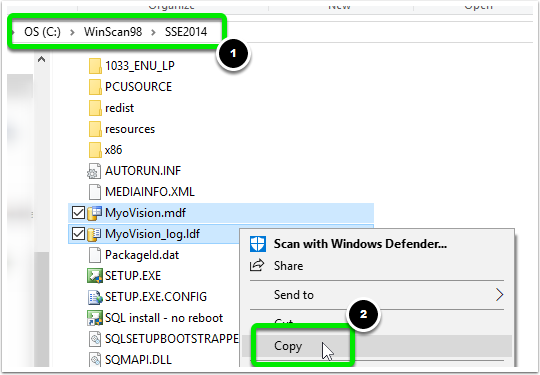
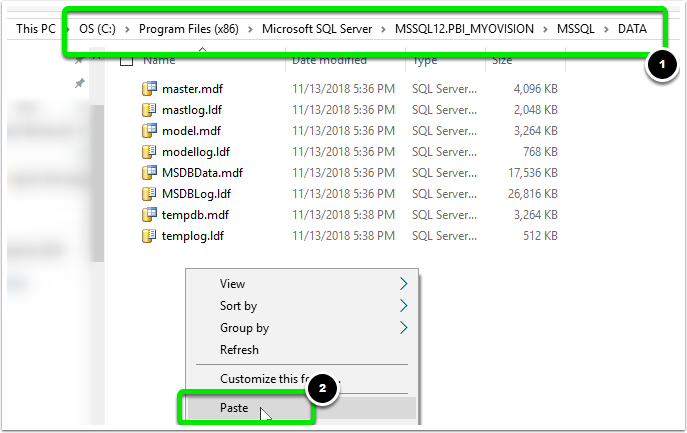
- Navigate to C:\Program Files (x86)\Microsoft SQL Server\MSSQL12.PBI_MYOVISION\MSSQL\DATA then right click and select "Paste."
- Inside the MyoVision software, click "Setup" and select "Database".

- When the window opens "Advanced" button to display the advanced options.
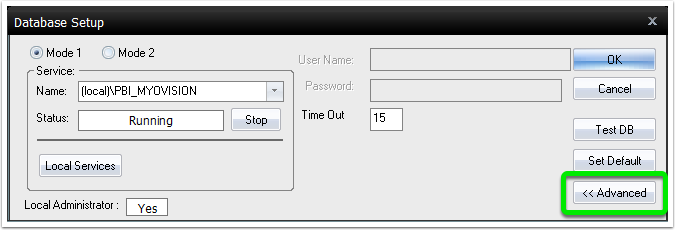
- Click "Attach".

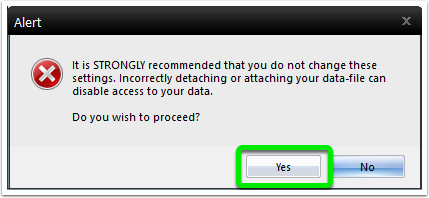
- A message will pop up asking if you would like to proceed. Click "Yes."
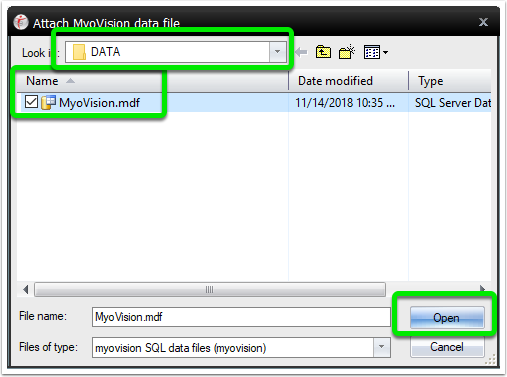
- Navigate back to C:\Program Files (x86)\Microsoft SQL Server\MSSQL12.PBI_MYOVISION\MSSQL\DATA and select the "Myovision.mdf" file. Then, click "Open."

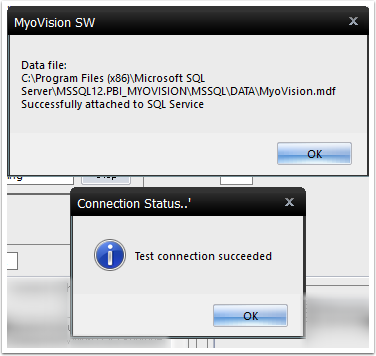
- If the data file was successfully attached the following messages will display.


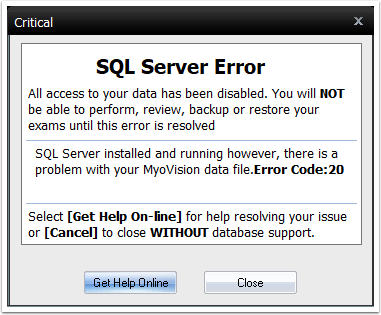
SQL Server Error Code 20
This error code is an indication that MyoVision software cannot communicate with the database. You may have to change User permissions or SQL Server permissions.
Click through the steps in the guide below for more information on resolving the SQL Server Error Code 20. **Make sure to restart your computer after you' ve finished made any changes to the SQL Server, **
Step 1: Attach Your Data File
SQL Server is a program created by Microsoft used to save large amounts of data. When you get the SQL Error Code 20 it means that SQL can't communicate with the file that stores your patient database (also called the Data File). In this step we will re-attach the Data File to SQL Server. **Make sure that you have MyoVision running and are logged into your computer as an administrator.**
- Open the "Setup" at the top of the MyoVision software and select "Database".
- Click the "Advanced" button to display the advanced options.

- Click the "Attach" button.
- A warning message will pop-up. Click "Yes".

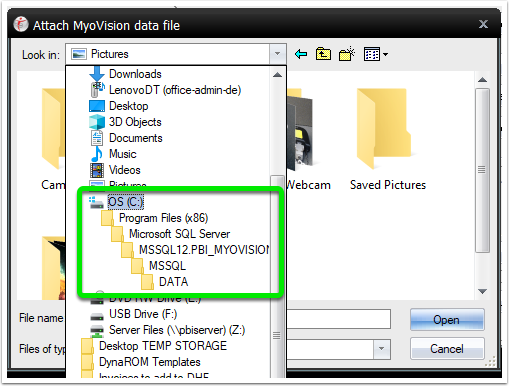
- In the window that opens navigate to the C:\ProgramFiles(x86)\Microsoft SQL Server\MSSQL12.PBI_MYOVISION\DATA\. Select the MyoVision file and click the "Open" button.
- If the file is successfully attached the following message will display.
 Attempt to open or perform an exam to verify the SQL Error has been resolved.


 Attempt to open or perform an exam to verify the SQL Error has been resolved.
If your SQL folder does not have a MyoVision file, continue to Step 2.
Step 2: Add Data File To SQL Server
If during Step 1 you were unable to locate your "Myovision.mdf" file this step will show you how to locate and add this file to your SQL Server folder.
- Open File Explorer. Navigate to the "C:\" drive. Open the "ProgramFiles(x86)" folder, then the "Microsoft SQL Server" folder. Open the "MSSQL12.PBI_MYOVISION" folder (this folder may also be called"MSSQL10.5.SQLEXPRESS"), open the "MSSQL" and "DATA" folders. Inside the "DATA" folder you should see both the "myovision.mdf" and "myovision_log.ldf" files.
 If you are unable to locate the "MSSQL12.PBI_MYOVISION" or the "MSSQL10.5.SQLEXPRESS" folders you will want to open the "C:\" drive in File Explorer. Then open the "ProgramFiles" folder and the "Microsoft SQL Server" folder.
 - If you are able to locate your SQL folder, but the "myovision.mdf" and "myovision_log.ldf" files are missing navigate back to "C:\" drive in File Explorer and open the "WinScan98" folder. Then, open the "SSE2014" folder. Hold down the control key on the keyboard, then left click the "myovision.mdf" and "myovision_log.ldf" files. Let go of the control key and right click one of the files. Select "Copy".

- Open the "C:\" drive again and select "ProgramFiles(x86)". Open the folders "Microsoft SQL Server," "MSSQL12.PBI_MYOVISION" (may also be called "MSSQL10.5.SQLEXPRESS"), "MSSQL," then open the "DATA" folder. Inside this folder, right-click and select "Paste."

**If you can't locate the "MSSQL12.PBI_MYOVISION" or "MSSQL10.5.SQLEXPRESS" folders you will want to open "ProgramFiles" and "Microsoft SQL Server". If you are still unable to find the "MSSQL12.PBI_MYOVISION" or "MSSQL10.5.SQLEXPRESS" folders, you will need to install SQL Server. Click Here to see our support guide on how to install SQL Server.** - Open the MyoVision software. Then, open "Setup" at the top and select "Database"

- Click the "Advanced" button.

- Click the "Attach" button.

- When the "Alert" message comes up, click "Yes".

- Click the drop-down menu labeled "Look-In" and select "C:\". Open the "ProgramFiles(x86)" folder, the "Microsoft SQL Server" folder, then open the folder for your SQL Server (either "MSSQL12.PBI_MYOVISION" or "MSSQL10.5.SQLEXPRESS"). Open the "MSSQL" and "DATA" folders.
- Select the "MyoVision.mdf" file and click the "Open" button.
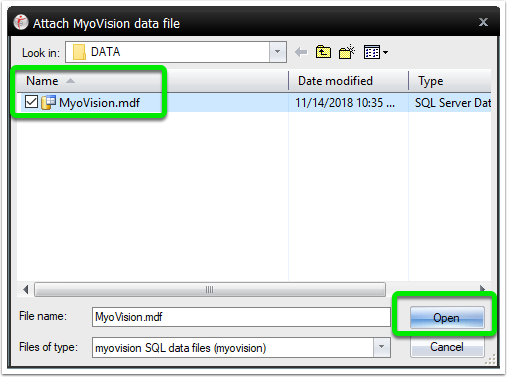
- The following message will display when the process is complete.

 If you are unable to locate the "MSSQL12.PBI_MYOVISION" or the "MSSQL10.5.SQLEXPRESS" folders you will want to open the "C:\" drive in File Explorer. Then open the "ProgramFiles" folder and the "Microsoft SQL Server" folder.


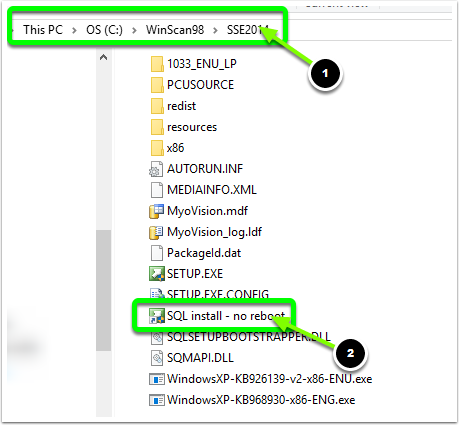
Install SQL Server Without Internet
- Open File Explorer and click on "My Computer" and the "C:\" drive.
- Open the "WinScan98" folder.
- Open the "SSE2014" folder. If the SSE2014 folder is missing open the "SSE" folder.
- Double-click the "SQL install - no reboot.exe" file.
- When the window opens select the option to "New SQL Server standalone installation or add features to an existing installation" .

- The software will begin processing your SQL installation. When the software asks whether you would like to "Perform a new installation" or to "Add features," select to "Perform a new installation" . Then, click "Next" .

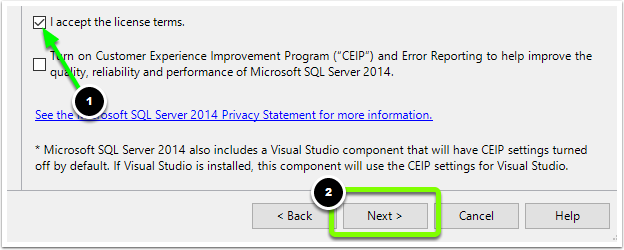
- On the next screen click the "I accept the license terms" check box. Then, click "Next" .
- On the next screen, click the "Select All" button then the "Next" button.
- On the next screen click the "Named instance" bubble and type "PBI_MYOVISION" into the "Named instance" text box.

- On the next screen make sure that the "Startup Type" drop-down options are both set to "Automatic" .
- On the next screen select "Mixed Mode" and set the password to "MyoVision01" . Then, click "Next".
 From here SQL Server will finish installing. When it' s finished restart your computer.


 From here SQL Server will finish installing. When it' s finished restart your computer.
Database Listed as "In Recovery"
If your database is listed as "In Recovery" it may be corrupted and requires a database restoration
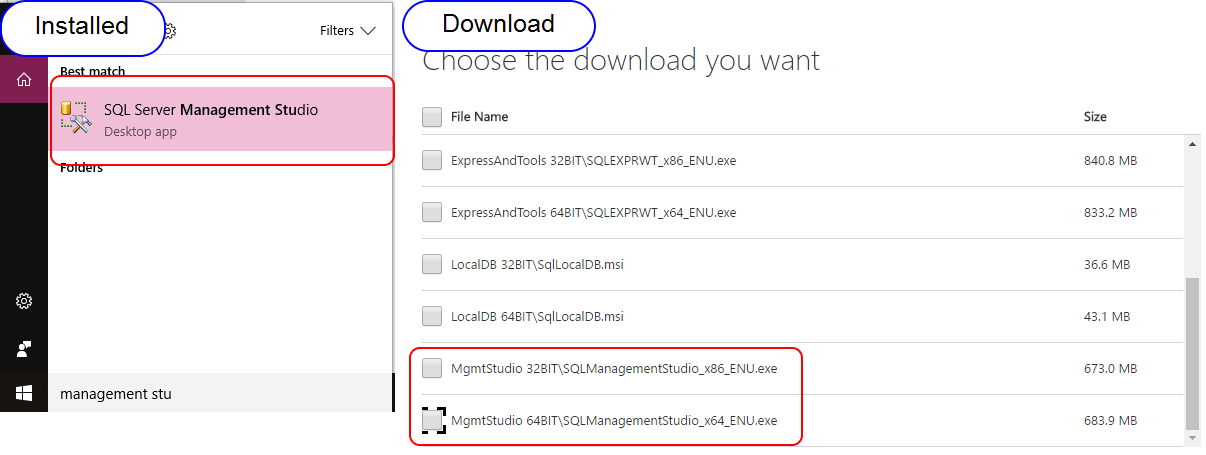
**If you do not already have Microsoft SQL Server Management Studio Express installed, you will need to download and install it before continuing. You will want to make sure that you download either the 32-bit or 64-bit version depending on which version of Windows your computer is running.**
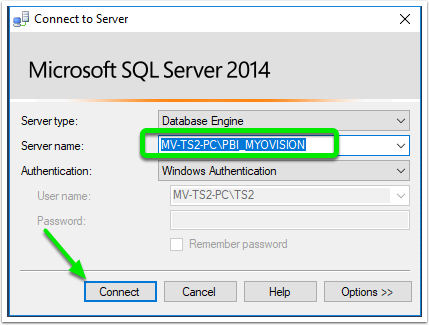
- Open Microsoft SQL Server Management Express. You should be given the option to open the program once the install has completed. If not, open the start menu and search for the program and run it.
"Server Name” will automatically fill-in based on information from your computer. There is NO need to change anything on this screen, even if it differs from the image below. Click the "Connect” button in the lower left-hand corner of the "Connect to Server” screen.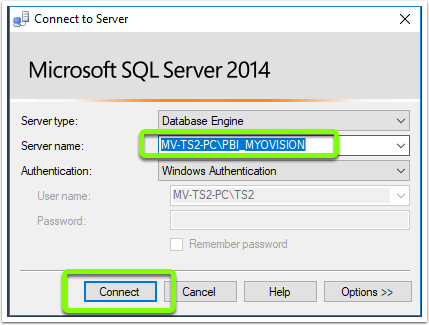
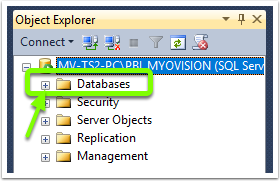
- On the left-hand side of the window double-click on the folder labeled "
Databases" .
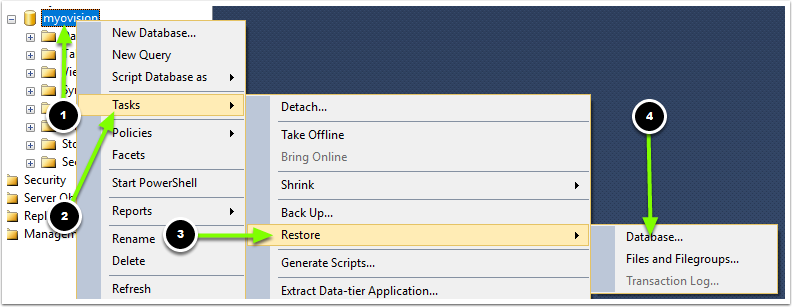
- Right-click on the MyoVision folder. It will say “
(in recovery)” next to it. On the menu, select “
Tasks.” Then choose the “
Restore” submenu and then the “
Database” option.
- Clicking on “Database” will open a new window. In the center of this screen, there will be a field marked “From database.” Select “myovision” and make sure the checkbox in the bottom screen is checked as seen below.
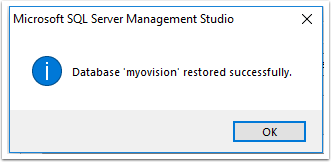
Click “OK” at the bottom of the screen.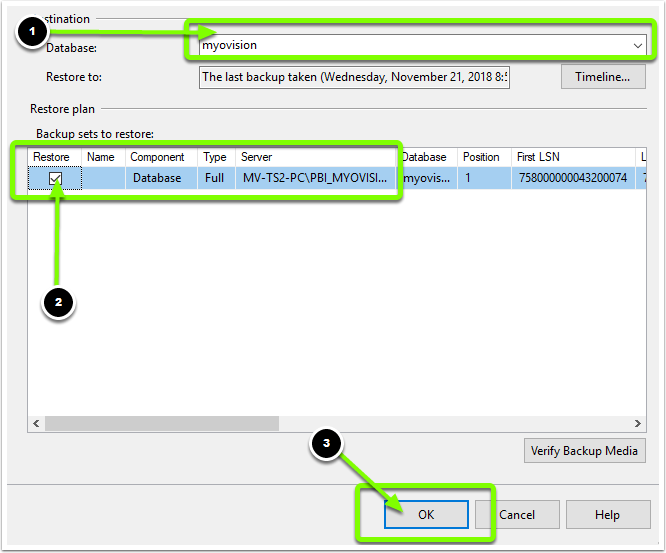 You will see a notification box when your database has been restored. Click “OK.”
- Close all windows and programs, and restart your computer. Open your MyoVision software. The problem should be resolved.


 You will see a notification box when your database has been restored. Click “OK.”

Edit Permissions of the SQL Server Folder
**DO NOT ATTEMPT THE FOLLOWING STEPS UNTIL YOU HAVE TRIED THE PREVIOUS SOLUTIONS POSTED**
Make sure that you've checked that SQL Server Express is installed, setup, and is running before changing the permissions.
In this troubleshooting step we will be editing the permissions of the SQL Server file to allow Users full control over the database.
- Open "Windows Explorer".

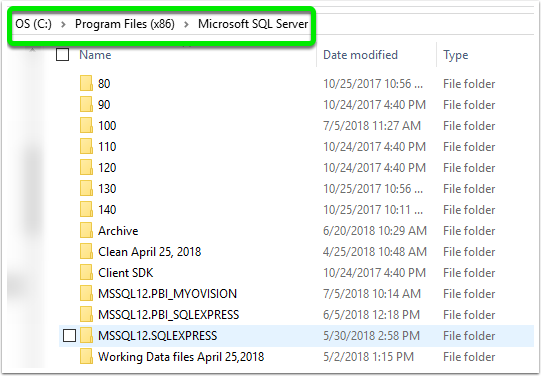
- Click on "This PC", open the "OS(C:)" folder, open "ProgramFiles(x86)", then find the "Microsoft SQL Server" folder.
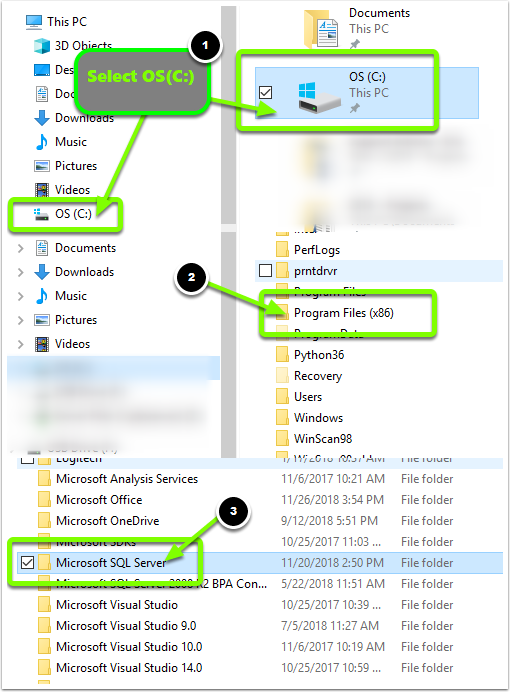
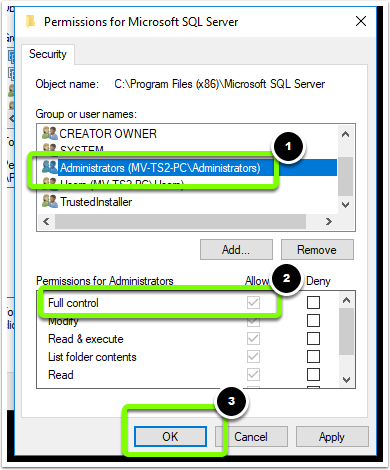
- Right-click on the Microsoft SQL Server folder and select Properties.
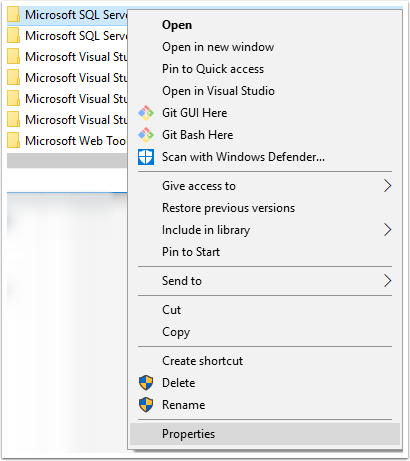
- From the Properties window, navigate to the Security tab, and click on Edit.
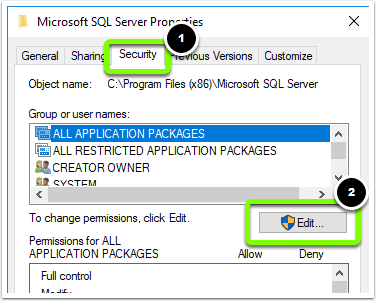
- Select the Users group and tick the Full control box under Allow. Click Apply then OK

- Repeat the process for the Administrator group and any other User/Group that will need access to the SQL Server database.
 Please attempt to access your database after completing the folder permission changes.


 Please attempt to access your database after completing the folder permission changes.
Are Your SQL Files Compressed?
If the software is telling you that the SQL file is compressed or you are unable to attach your SQL file to the SQL service, you will want to check and see if your SQL files are compressed. The steps below will show you how to check whether your SQL files are compressed.
- Open File Explorer.

- Navigate to "My Computer", "OS (C:)", "ProgramFiles(x86)", "Microsoft SQL Server", and locate the folder that contains your SQL files.
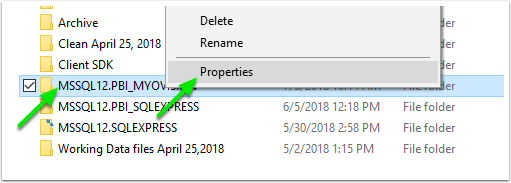
- Right-click your SQL Server folder and select "Properties".
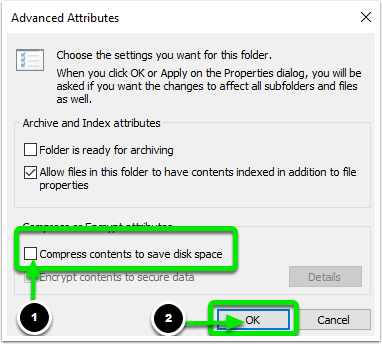
- Click the "Advanced" button.

- Verify that the check box next to "Compress contents to save disk space" is blank. If the box is checked, click on it to remove check mark. Click "OK" to save your settings.
- Back in the MyoVision software, open the Setup menu and select "Database".

- Click the "TestDB" button to test your SQL server.
 If the SQL Server is working properly the following message will display.
 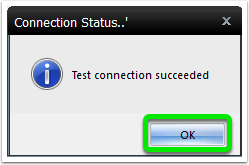 You may need to re-attach your database file after decompressing it. For more information on how to re-attach your database file Click Here.


 If the SQL Server is working properly the following message will display.
  You may need to re-attach your database file after decompressing it. For more information on how to re-attach your database file
 Additional Recommendations with SQL Server
Here' s a list of things that we've discovered that help your computer and your SQL server run better. If you follow these Dos and Don' ts, you will be less likely to have further problems with your software.
- Windows will sometimes prompt you to compress your files when you are running out of room on your hard drive. DON’
T compress. The compression of your files will damage your SQL database files and make it impossible to open your saved screenings.
- DO update your computer regularly. Check regularly for updates and give your computer time to download and install these updates at least once a week.
- DO backup your database regularly (daily backups are suggested). You’ ll be happy to have your scans backed up should disaster strike.
Advanced: Edit SQL Security Permissions
**Note: You must perform these actions from the User Account\Login that originally installed the MyoVision software.
This step requires Microsoft SQL Server Management Studio. Do a search in your start menu to see if you have it installed already. If you do not see it, head to Microsoft' s Download Page, click Download.
Scroll to the bottom of the options and download the appropriate version of SQL Management Studio x86 is for 32bit operating systems and x64 is for 64bit.
How to Check if Windows is 32 bits or 64 bits.
Once it finished downloading, run the installer. You will want to " add features" to an existing instance.
- Open "Microsoft SQL Server Management Studio Express". The “Server Name” will automatically be filled in based on information from your computer.
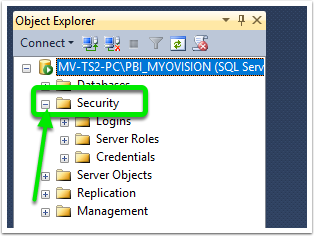
- You will be at a window with a list of files running down the left-hand side. Locate the second folder from the top says “Security.”
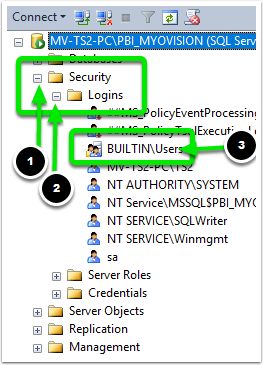
- Expand this list of folders by double-clicking on the folder and locate "BUILTIN\Users" nested under Logins.
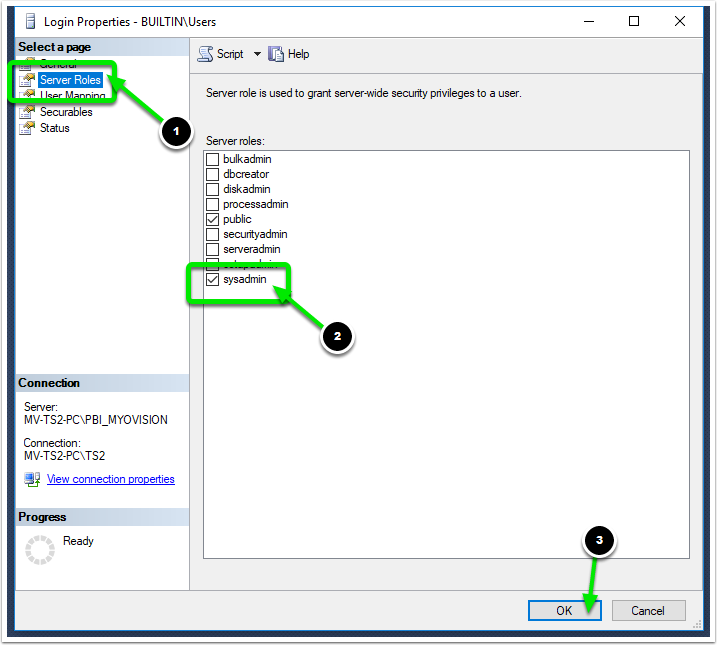
- Double-click "BUILTIN\Users" and then select "Server Roles". Check the box next to "sysadmin" as seen below. Click "OK".


Close all windows and programs and restart your computer.
Your problem should be resolved when you open the MyoVision software.
SQL Error - Update Fails
This section will address what to do if you are running a SQL Server 2005 Express and Service Pack 3 (SP3) update and it fails. It should be noted that if any SQL update is failing, regardless of the number, this section may apply to you. Windows will download several updates for SQL and other applications automatically. These updates are very important to the effectiveness and functionality of your machine and software. However, some updates can also cause an error message that prevents the SQL Server from running and, in turn, prevents your MyoVision software from functioning properly. This section will walk you through how to fix the update error so that you can continue to use your MyoVision.
Note Before You Begin: It is important to backup your Registry (Step 5.3) before altering/editing your registry as mistakes can horribly damage your computer' s functionality.
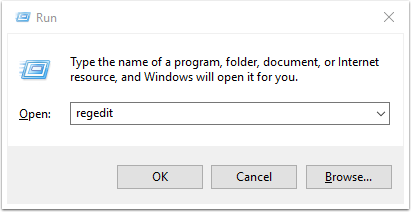
Go to the Start Menu and search for "Run" then select the "Run" program.
In the run program type "regedit" and click "OK". Click "Yes" if a window pops up.
**Before you go any further: BACK UP YOUR REGISTRY!! If you do not know how to back-up your registry more information can be found here: http: //windowsxp.mvps.org/registry.htm.**
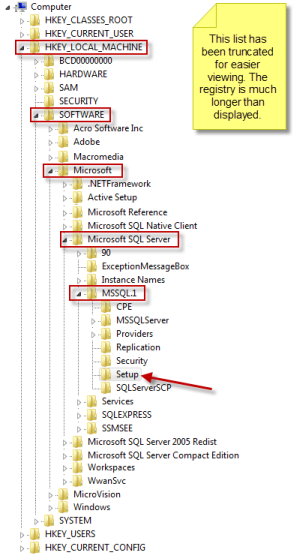
In the Registry Editor, double-click on the folder "HKEY_LOCAL”, then double-click "SOFTWARE” , then double-click “ Microsoft” , then “ Microsoft SQL Server” , then “ MSSQL.1” , then “ Setup.” See the path map here:
[HKEY_LOCAL_MACHINE\SOFTWARE\Microsoft\Microsoft SQL Server\MSSQL.1\Setup]
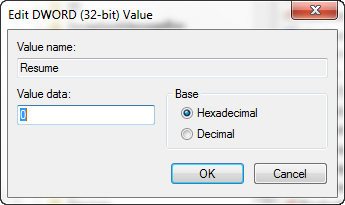
Locate the “Resume REG_DWORD” file, and double-click. This will bring up a window titled “ Edit DWORD, ” or something similar depending on which version of Windows you are running.
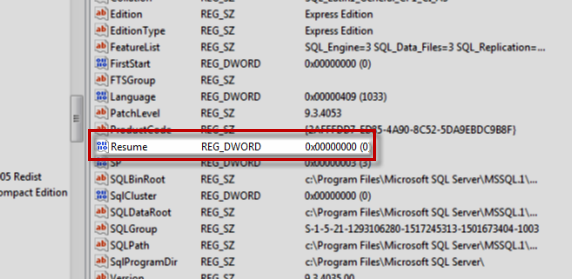
The decimal value will say “ 1” . Change the decimal value to “ 0” and click “ OK” .
Repeat step these steps for files “ MSSQL.2” and “ MSSQL.3” . These files will be in the same “ Microsoft SQL Server” folder. You will need to make sure you go to their individual “ Setup” folders, as you did in step 5.4. Their respective path maps look like this:
- [HKEY_LOCAL_MACHINE\SOFTWARE\Microsoft\Microsoft SQL Server\MSSQL.2\Setup]
- [HKEY_LOCAL_MACHINE\SOFTWARE\Microsoft\Microsoft SQL Server\MSSQL.3\Setup]
After you have set the decimal values to 0, run the program Windows Update.
Close all windows and programs then restart your computer.
When you open your MyoVision software your issue should be resolved.